.png)
Ask Knowledge Base Action
-

- Saeid Kajkolah
 17 July 2024
One of the most utilized features based on our customer experience is the “Ask Knowledge Base” action. This action is among the AI actions in the left side menu and is a free feature that you can use for your business.
When to use the Ask Knowledge Base action?
The Ask Knowledge Base action is a powerful feature that allows you to infuse your AI agent with specific data. This data can be your website URLs, sitemap, or files in different formats.
When you provide your content, the AI agent scans, crawls, and learns from the information available in that content. This could include details about your products, services, company history, and more. If you provide a sitemap, the AI agent understands the structure of your site and finds the information it needs more efficiently.
Once the AI agent is trained on your data, it can leverage this knowledge to answer customer inquiries independently. This means that instead of relying on pre-defined responses, the AI agent can generate answers based on the specific data it has been trained on. This allows for more accurate and context-specific responses.
How to use the Ask Knowledge Base action?
Upload your content:
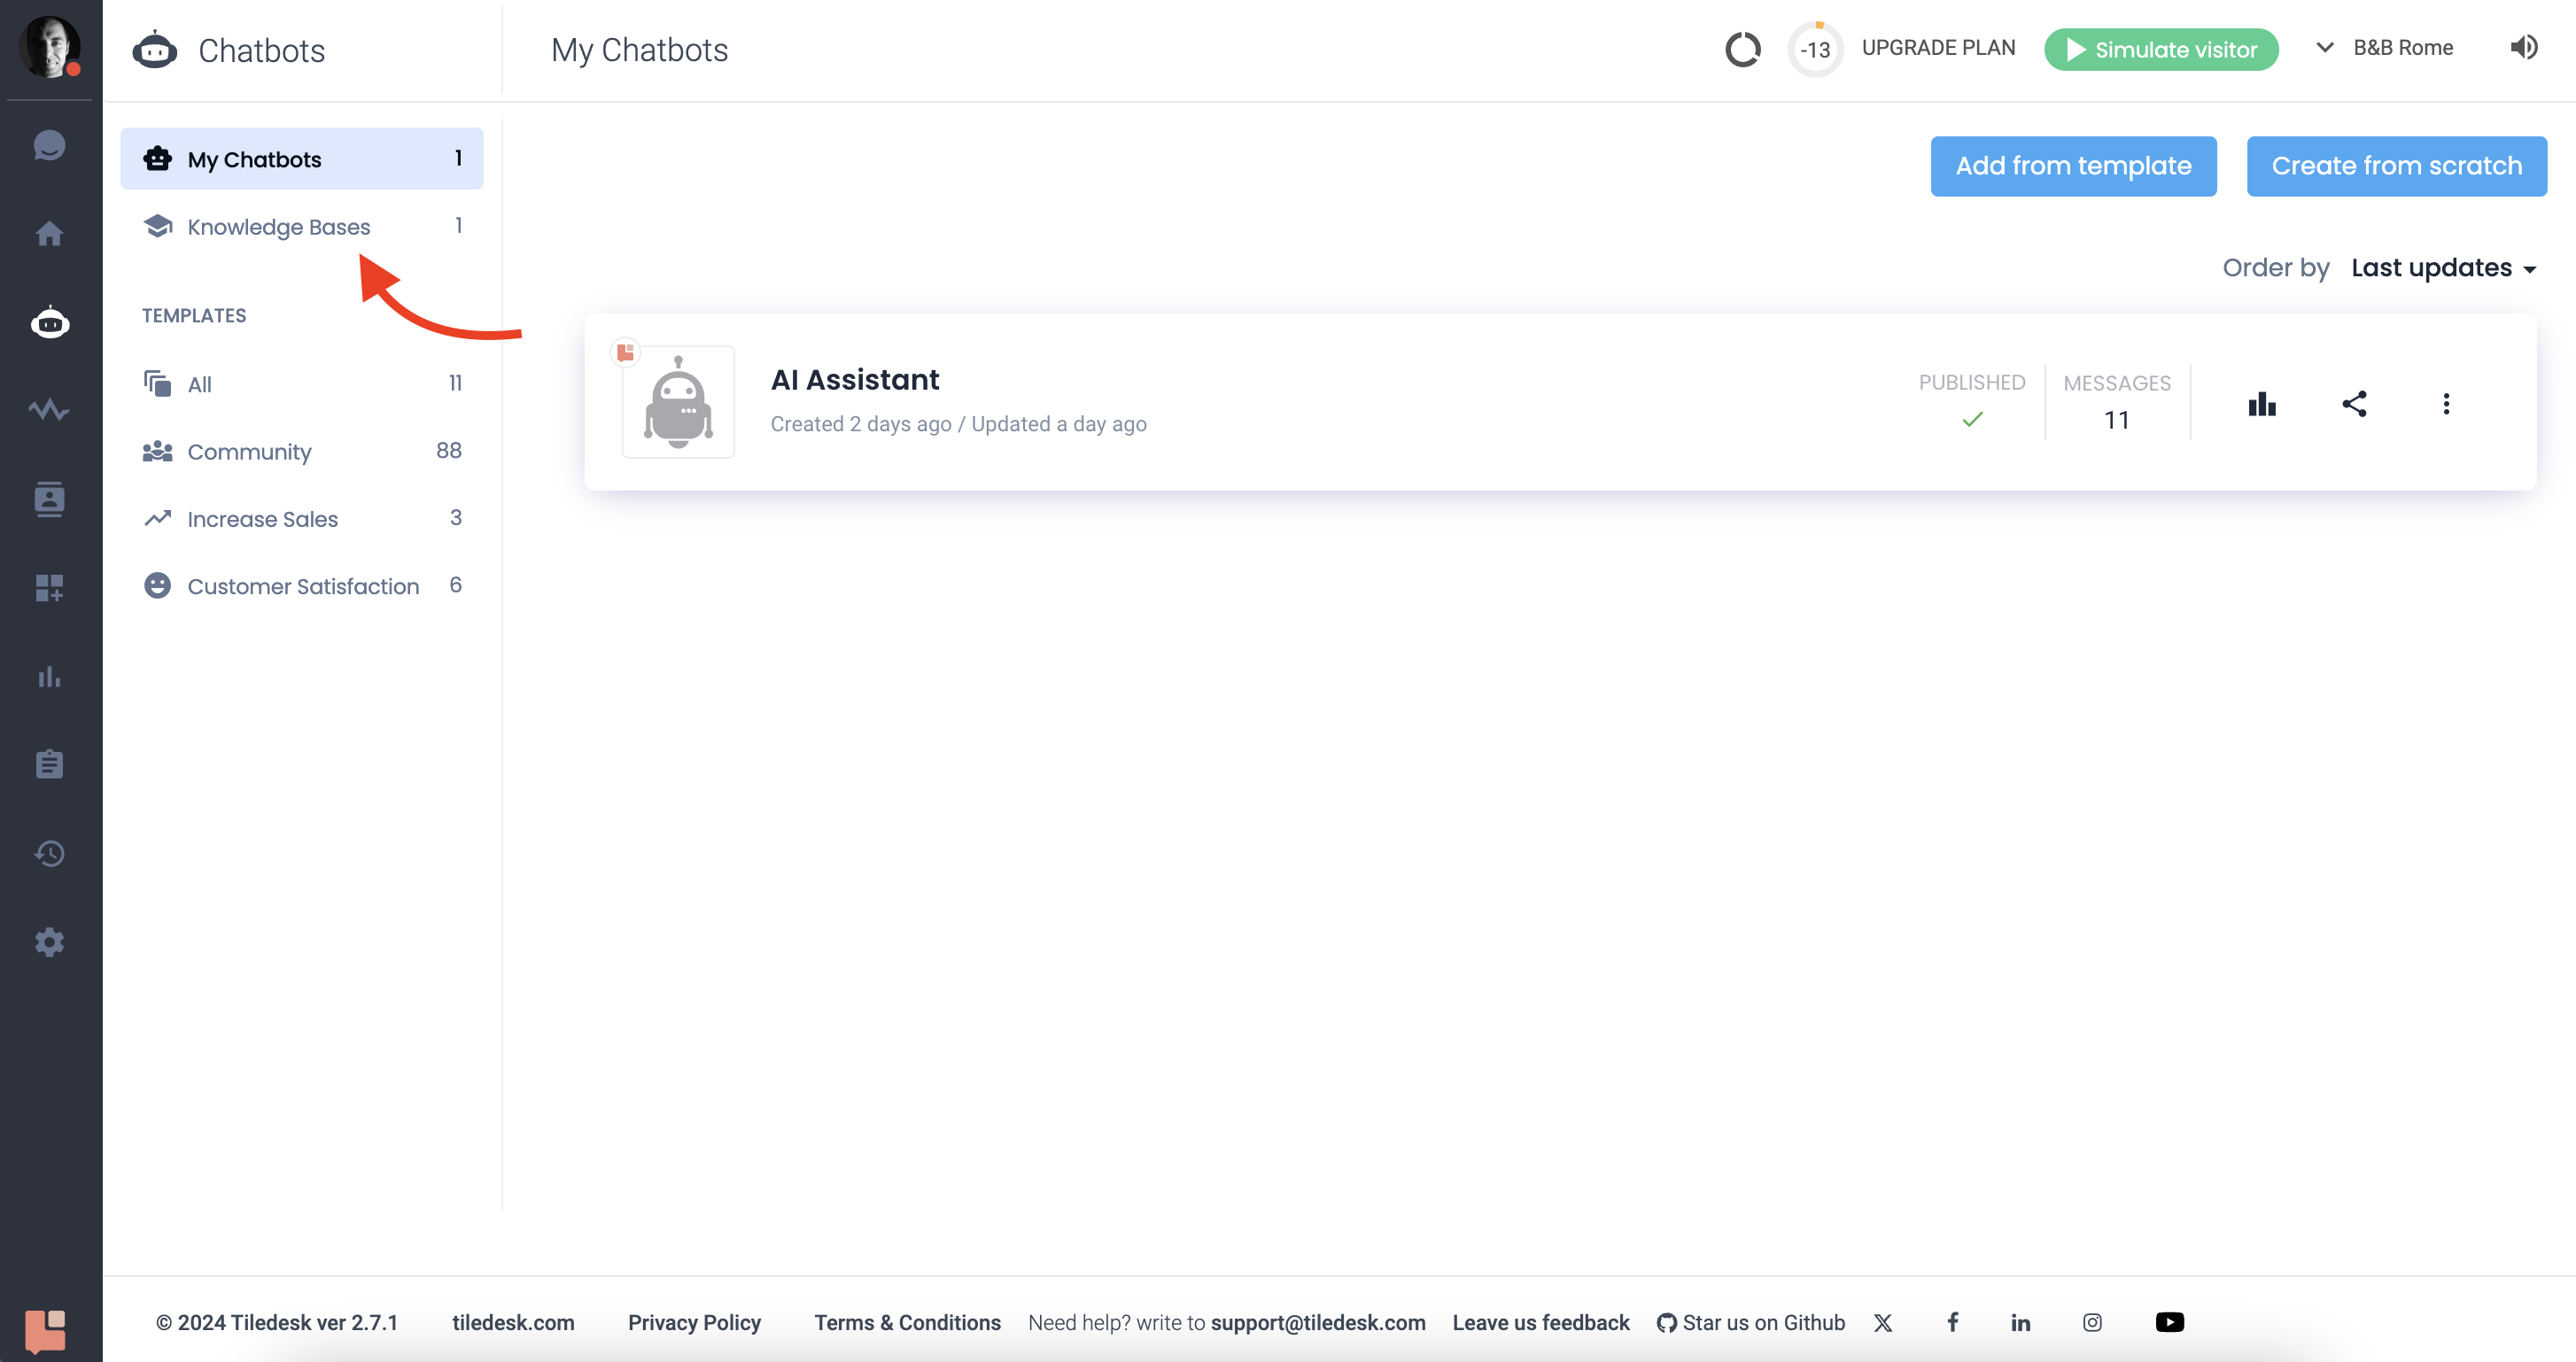
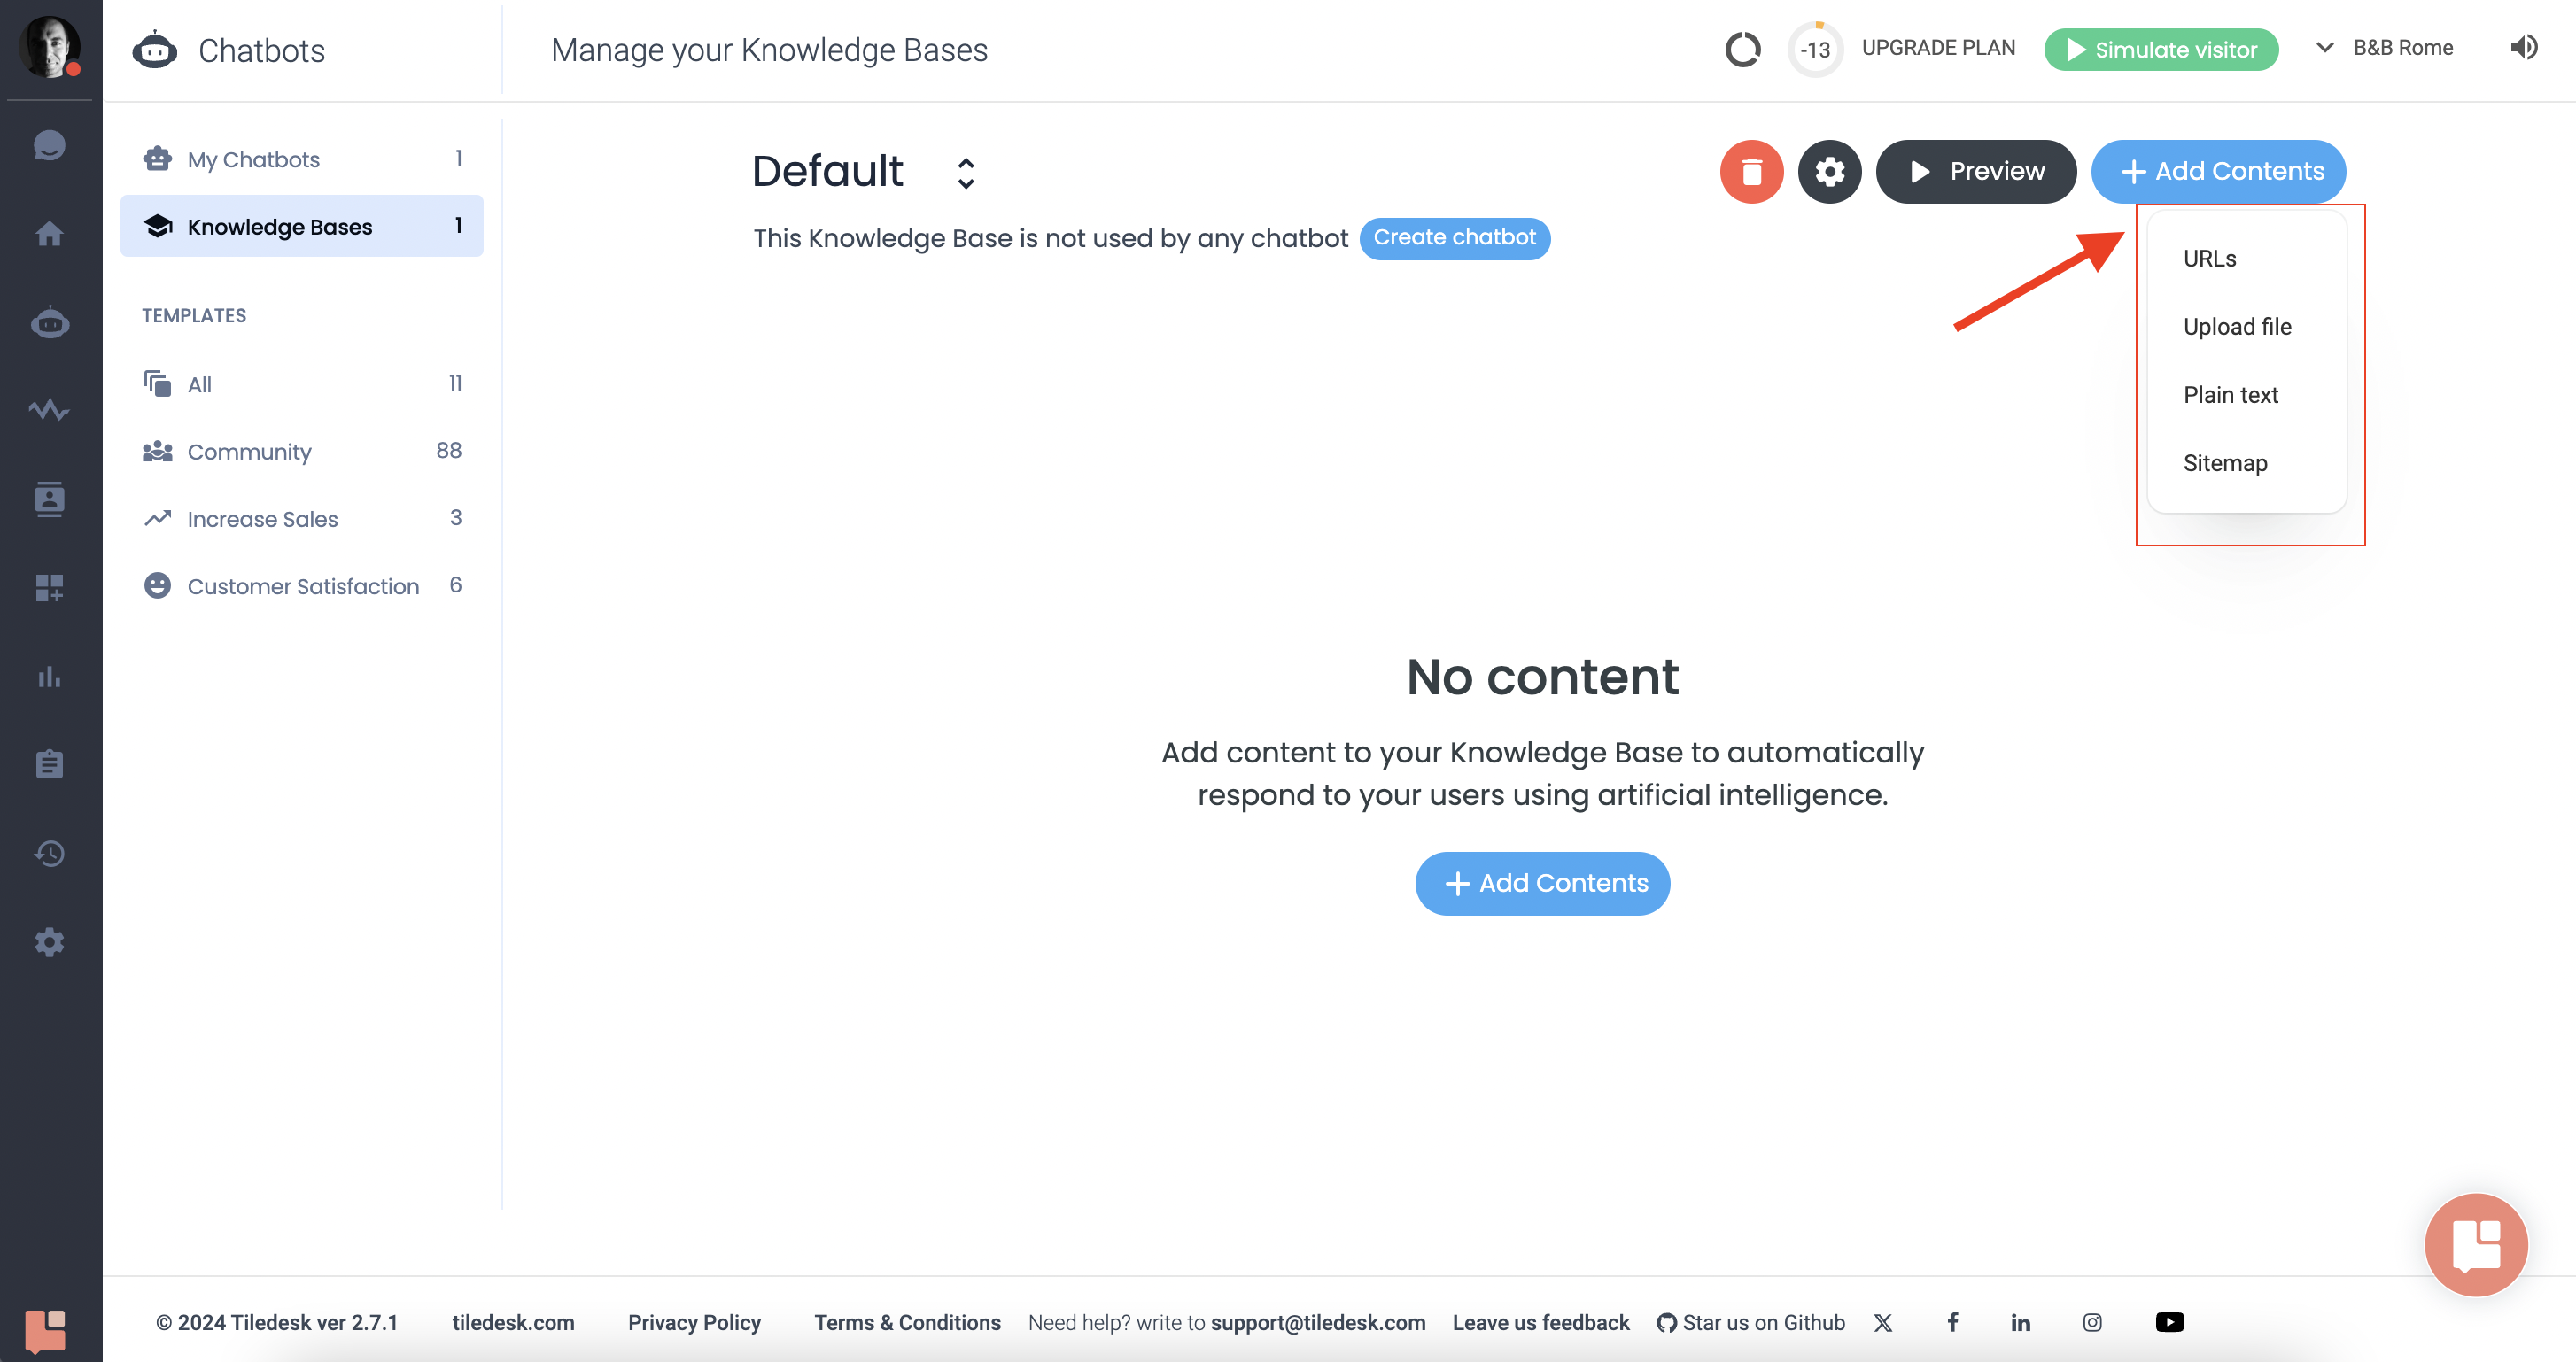
First, you need to upload your content on the Tiledesk system. Head to the Tiledesk dashboard, select “Bots” from the left sidebar menu, then you will see the “Knowledge Bases”. Click on it to lead to the Knowledge Bases page.
Add your content:
When it comes to uploading content on the Tiledesk dashboard, the format you choose can impact how your information is communicated via the AI Agent. Here are some guidelines to help you select the best format for your needs:
FAQs: If you’re looking to upload Frequently Asked Questions (FAQs), you can simply copy and paste your questions and their corresponding answers one after the other into the plain text section. This classic Question/Reply format is simple, straightforward, and easy for the AI Agent to navigate.
Company documents: If you have company documents to share, these are generally in PDF or DOCX format. These formats are ideal for preserving the layout and formatting of your original documents, ensuring that your AI Agent can retrieve data and share it with customers.
Published Knowledge Bases: If you already have a published knowledge base, website URLs are your best option. You can simply paste the URLs in bulk. This allows users to access your existing resources directly, without the need for additional formatting or uploading.
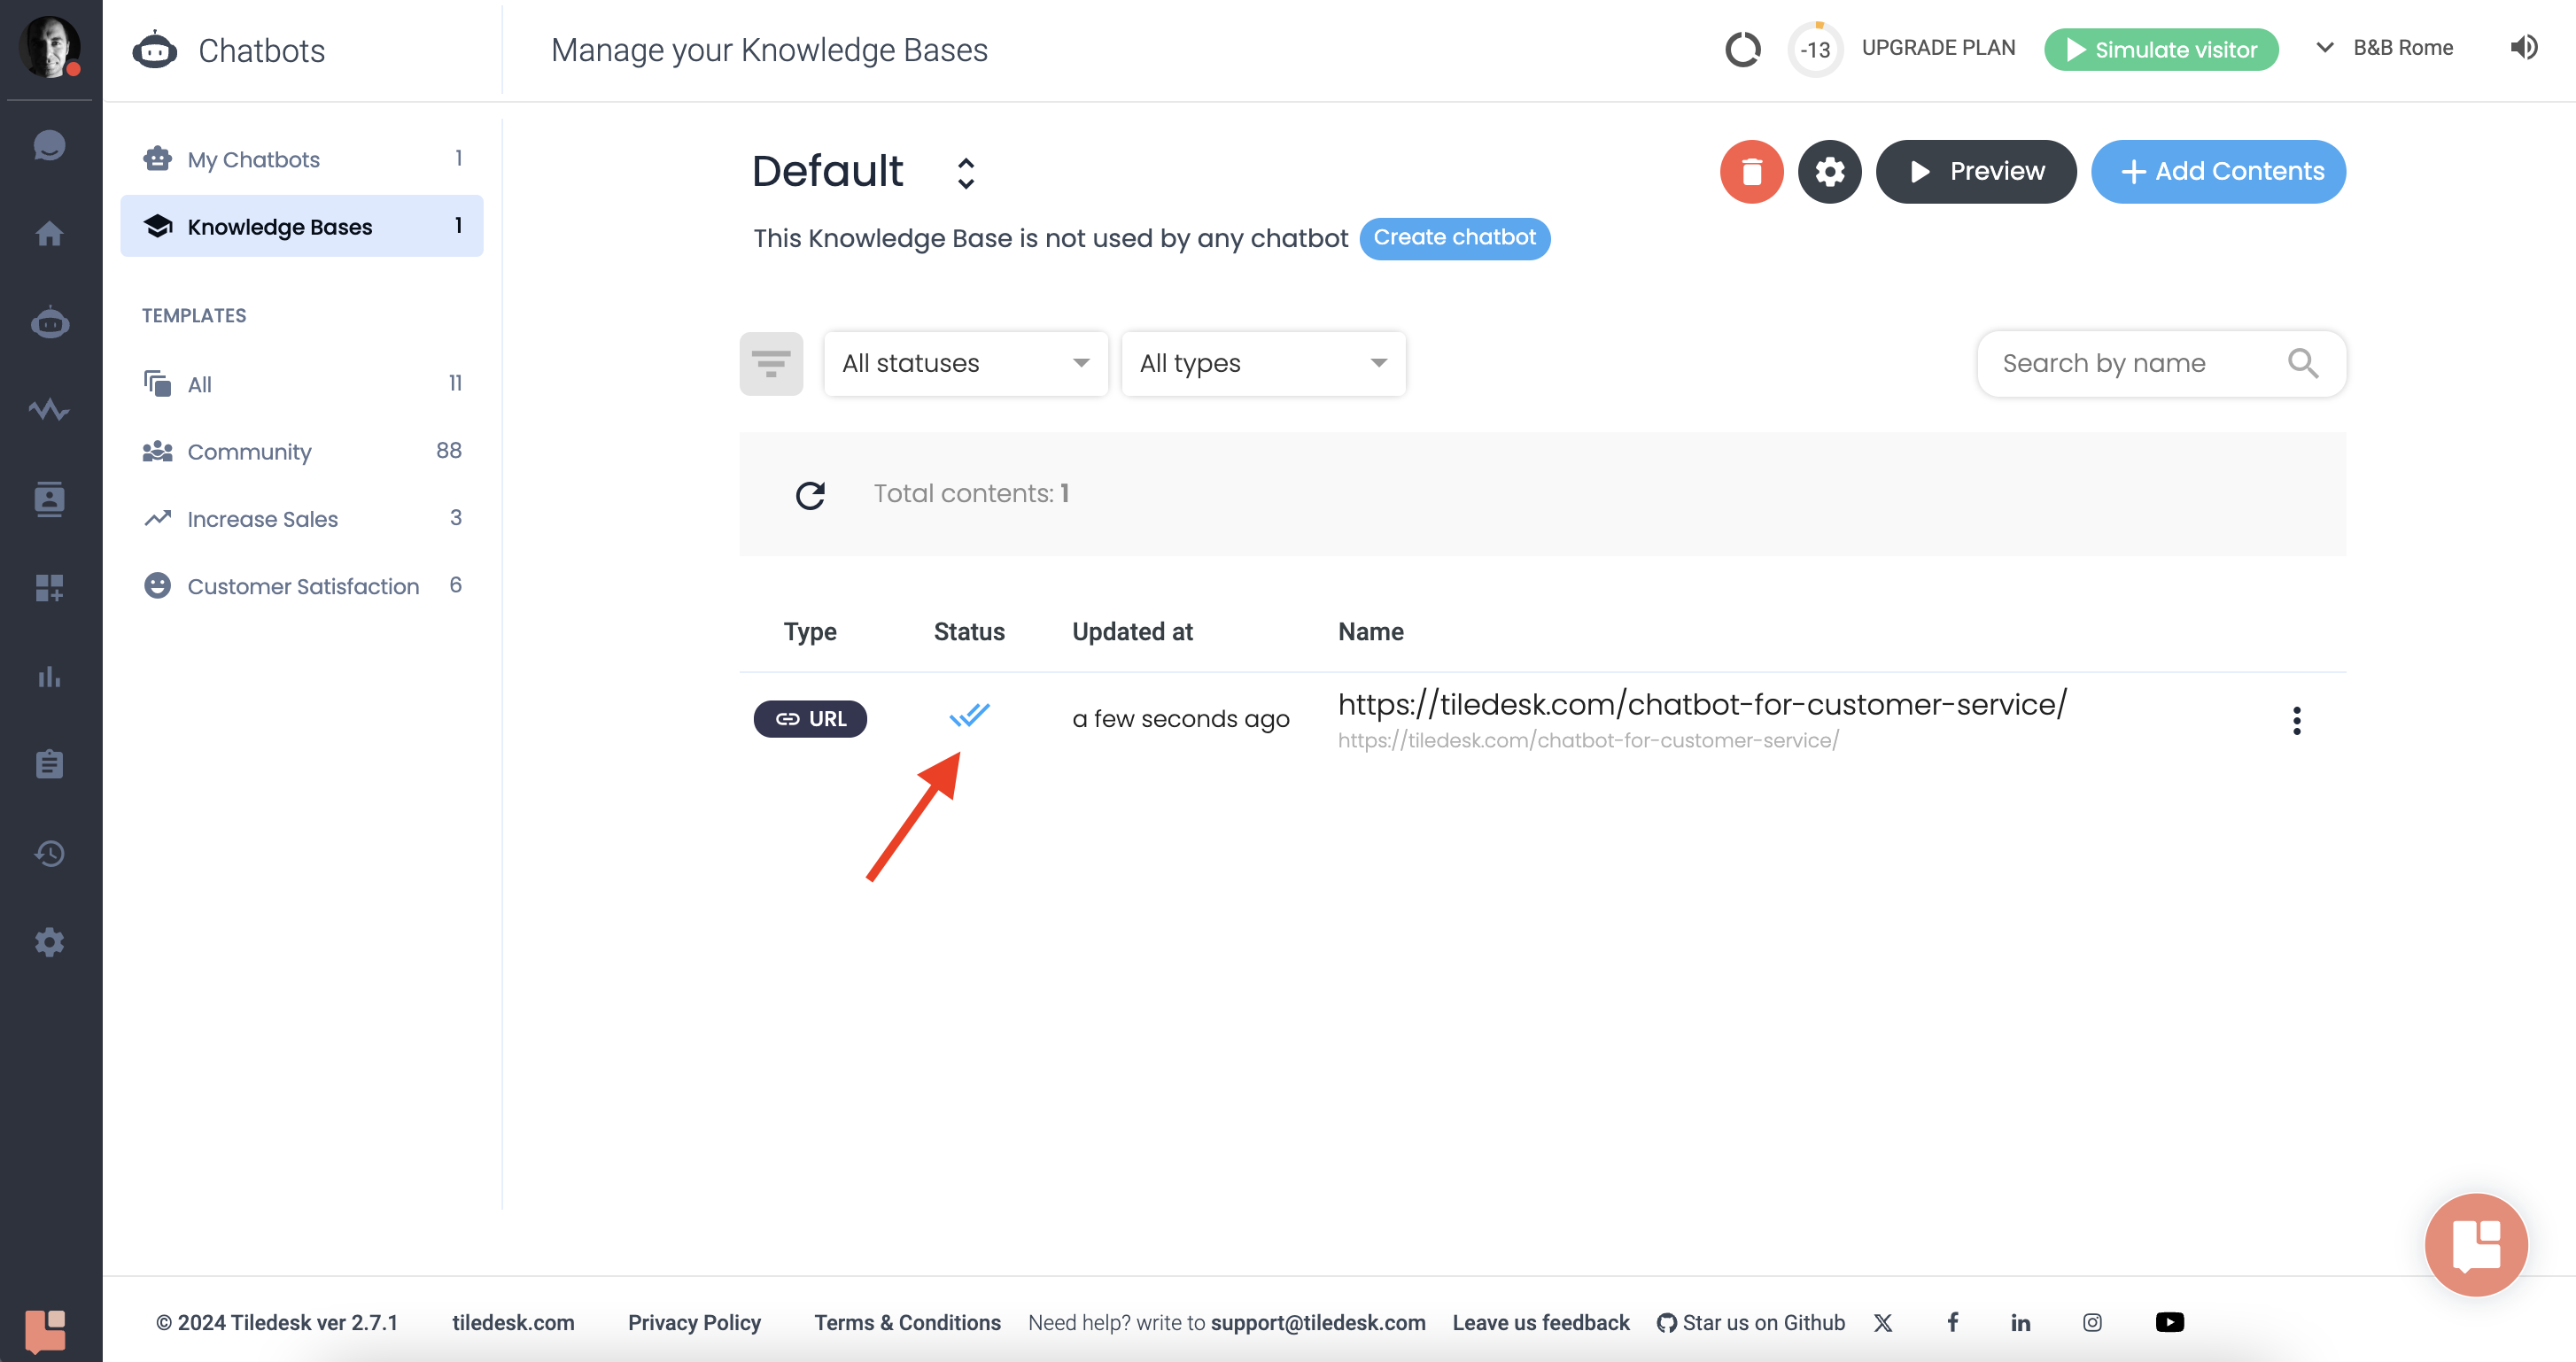
Remember, after uploading your content, ensure that it’s indexed. A double blue tick on the Tiledesk dashboard indicates successful indexing. This means your content is now ready to be accessed by users.
Create/Edit an AI Agent:
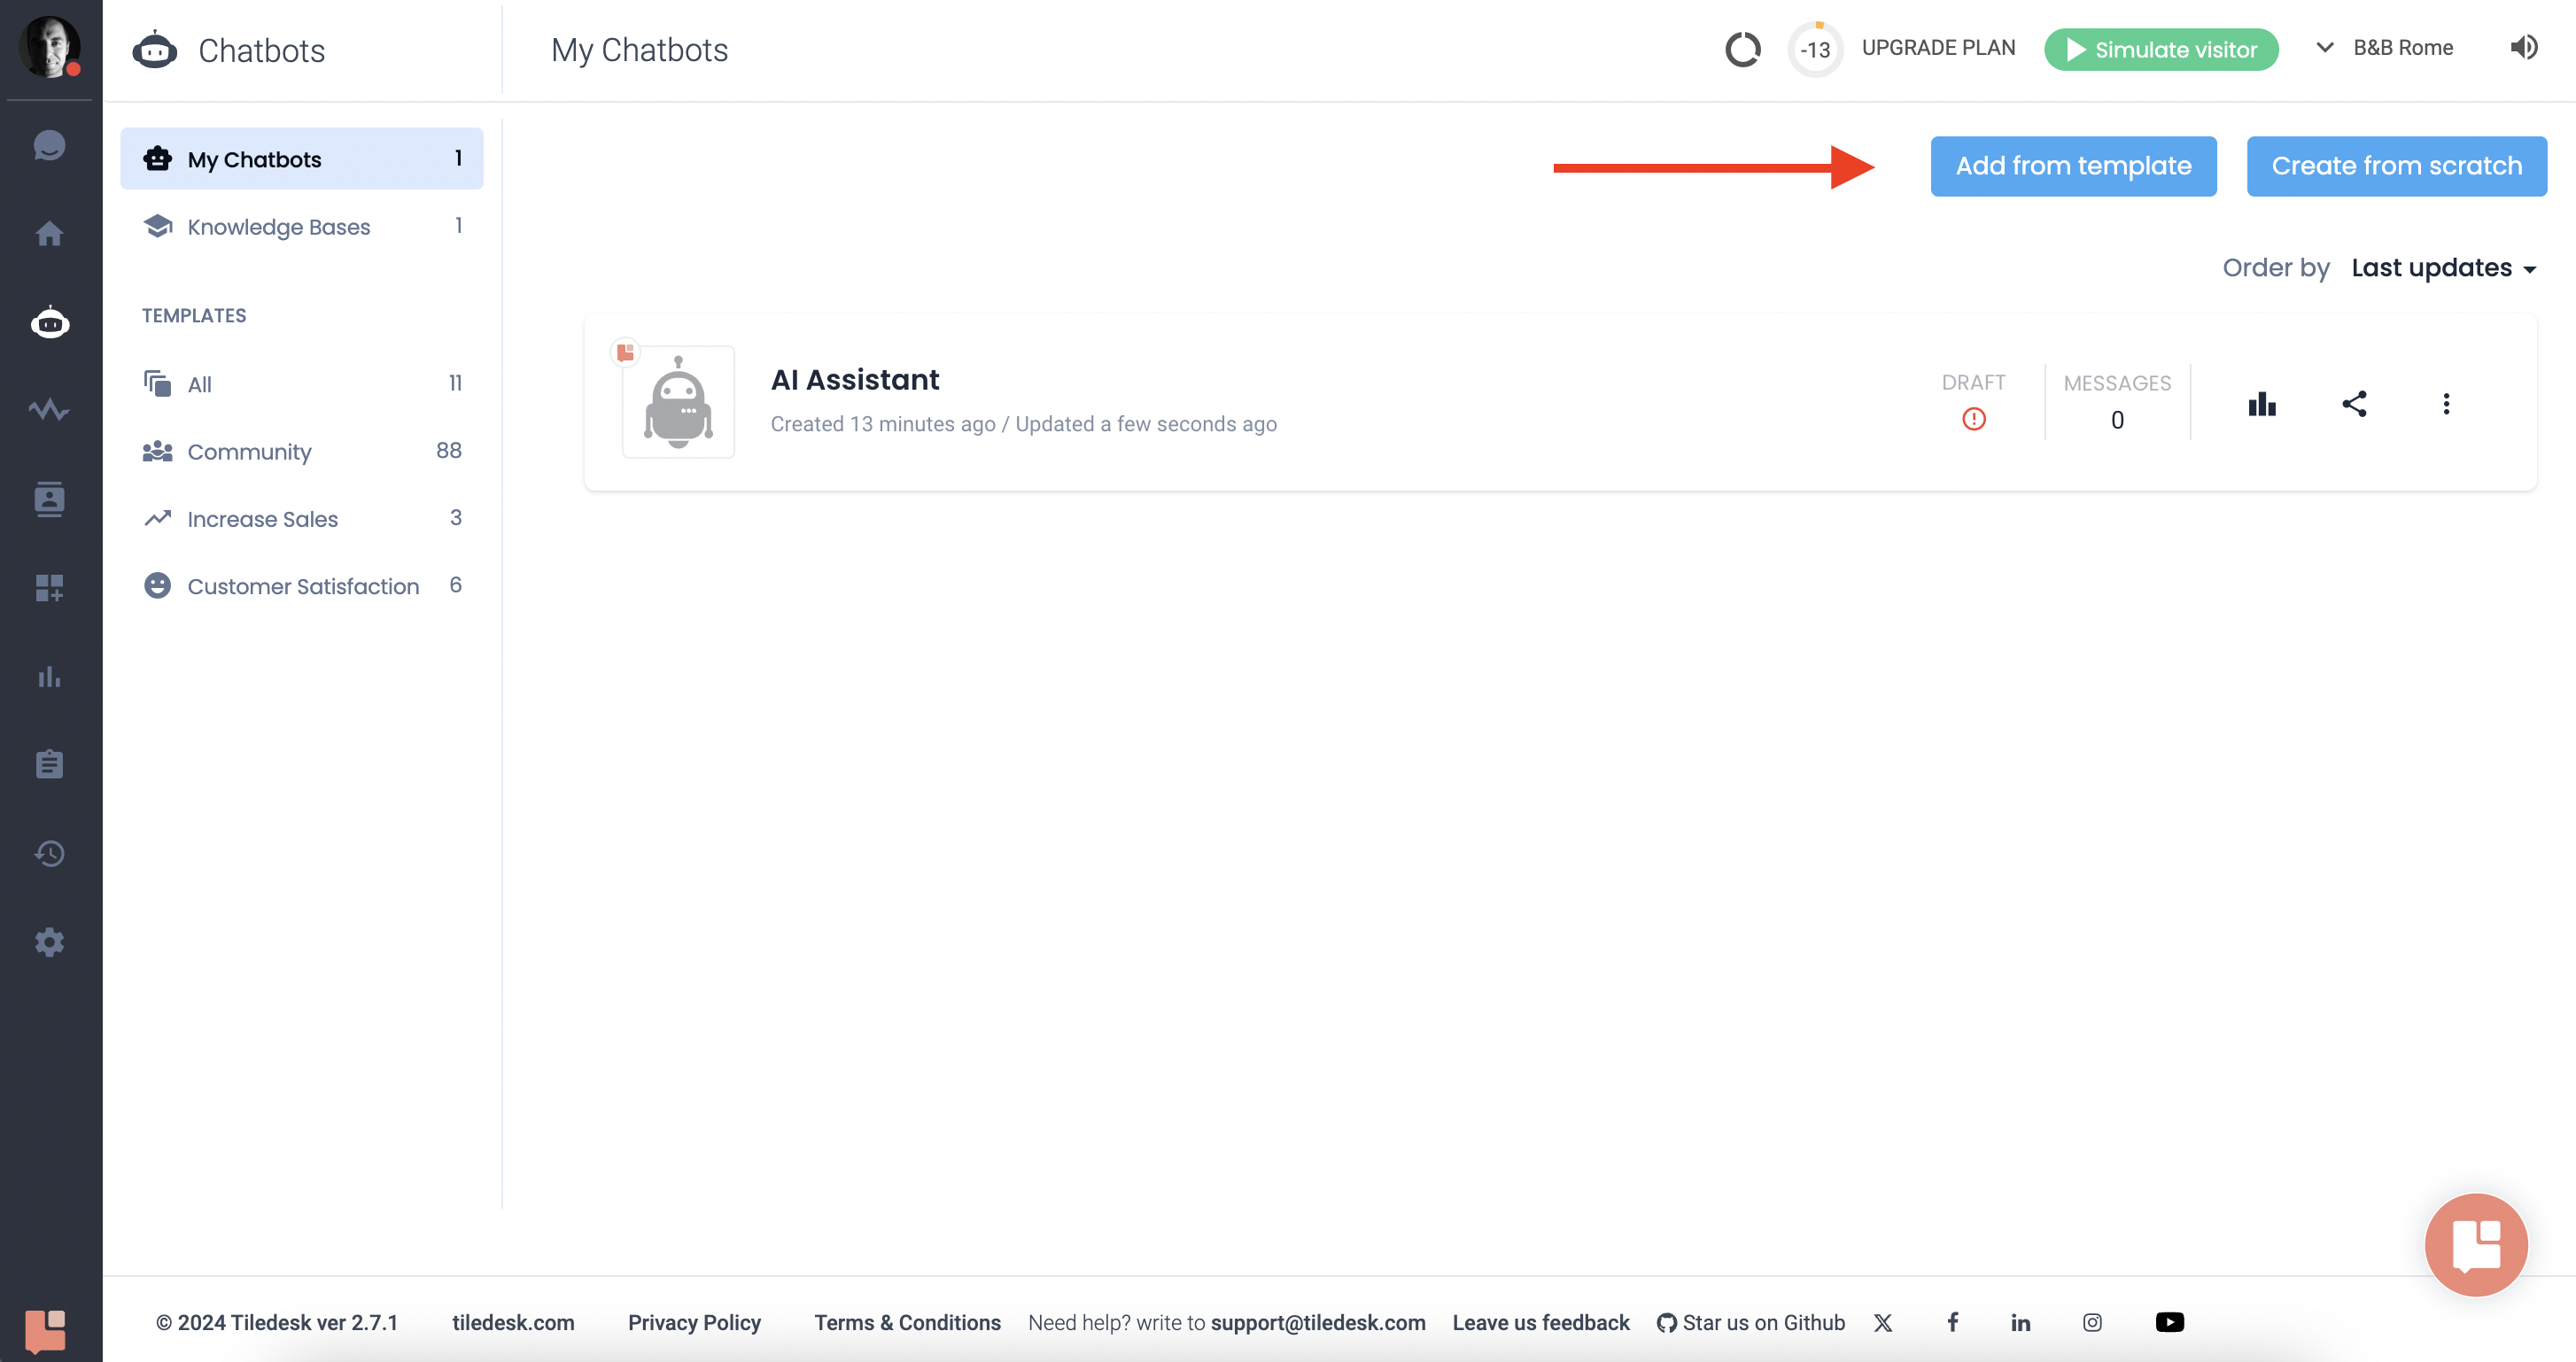
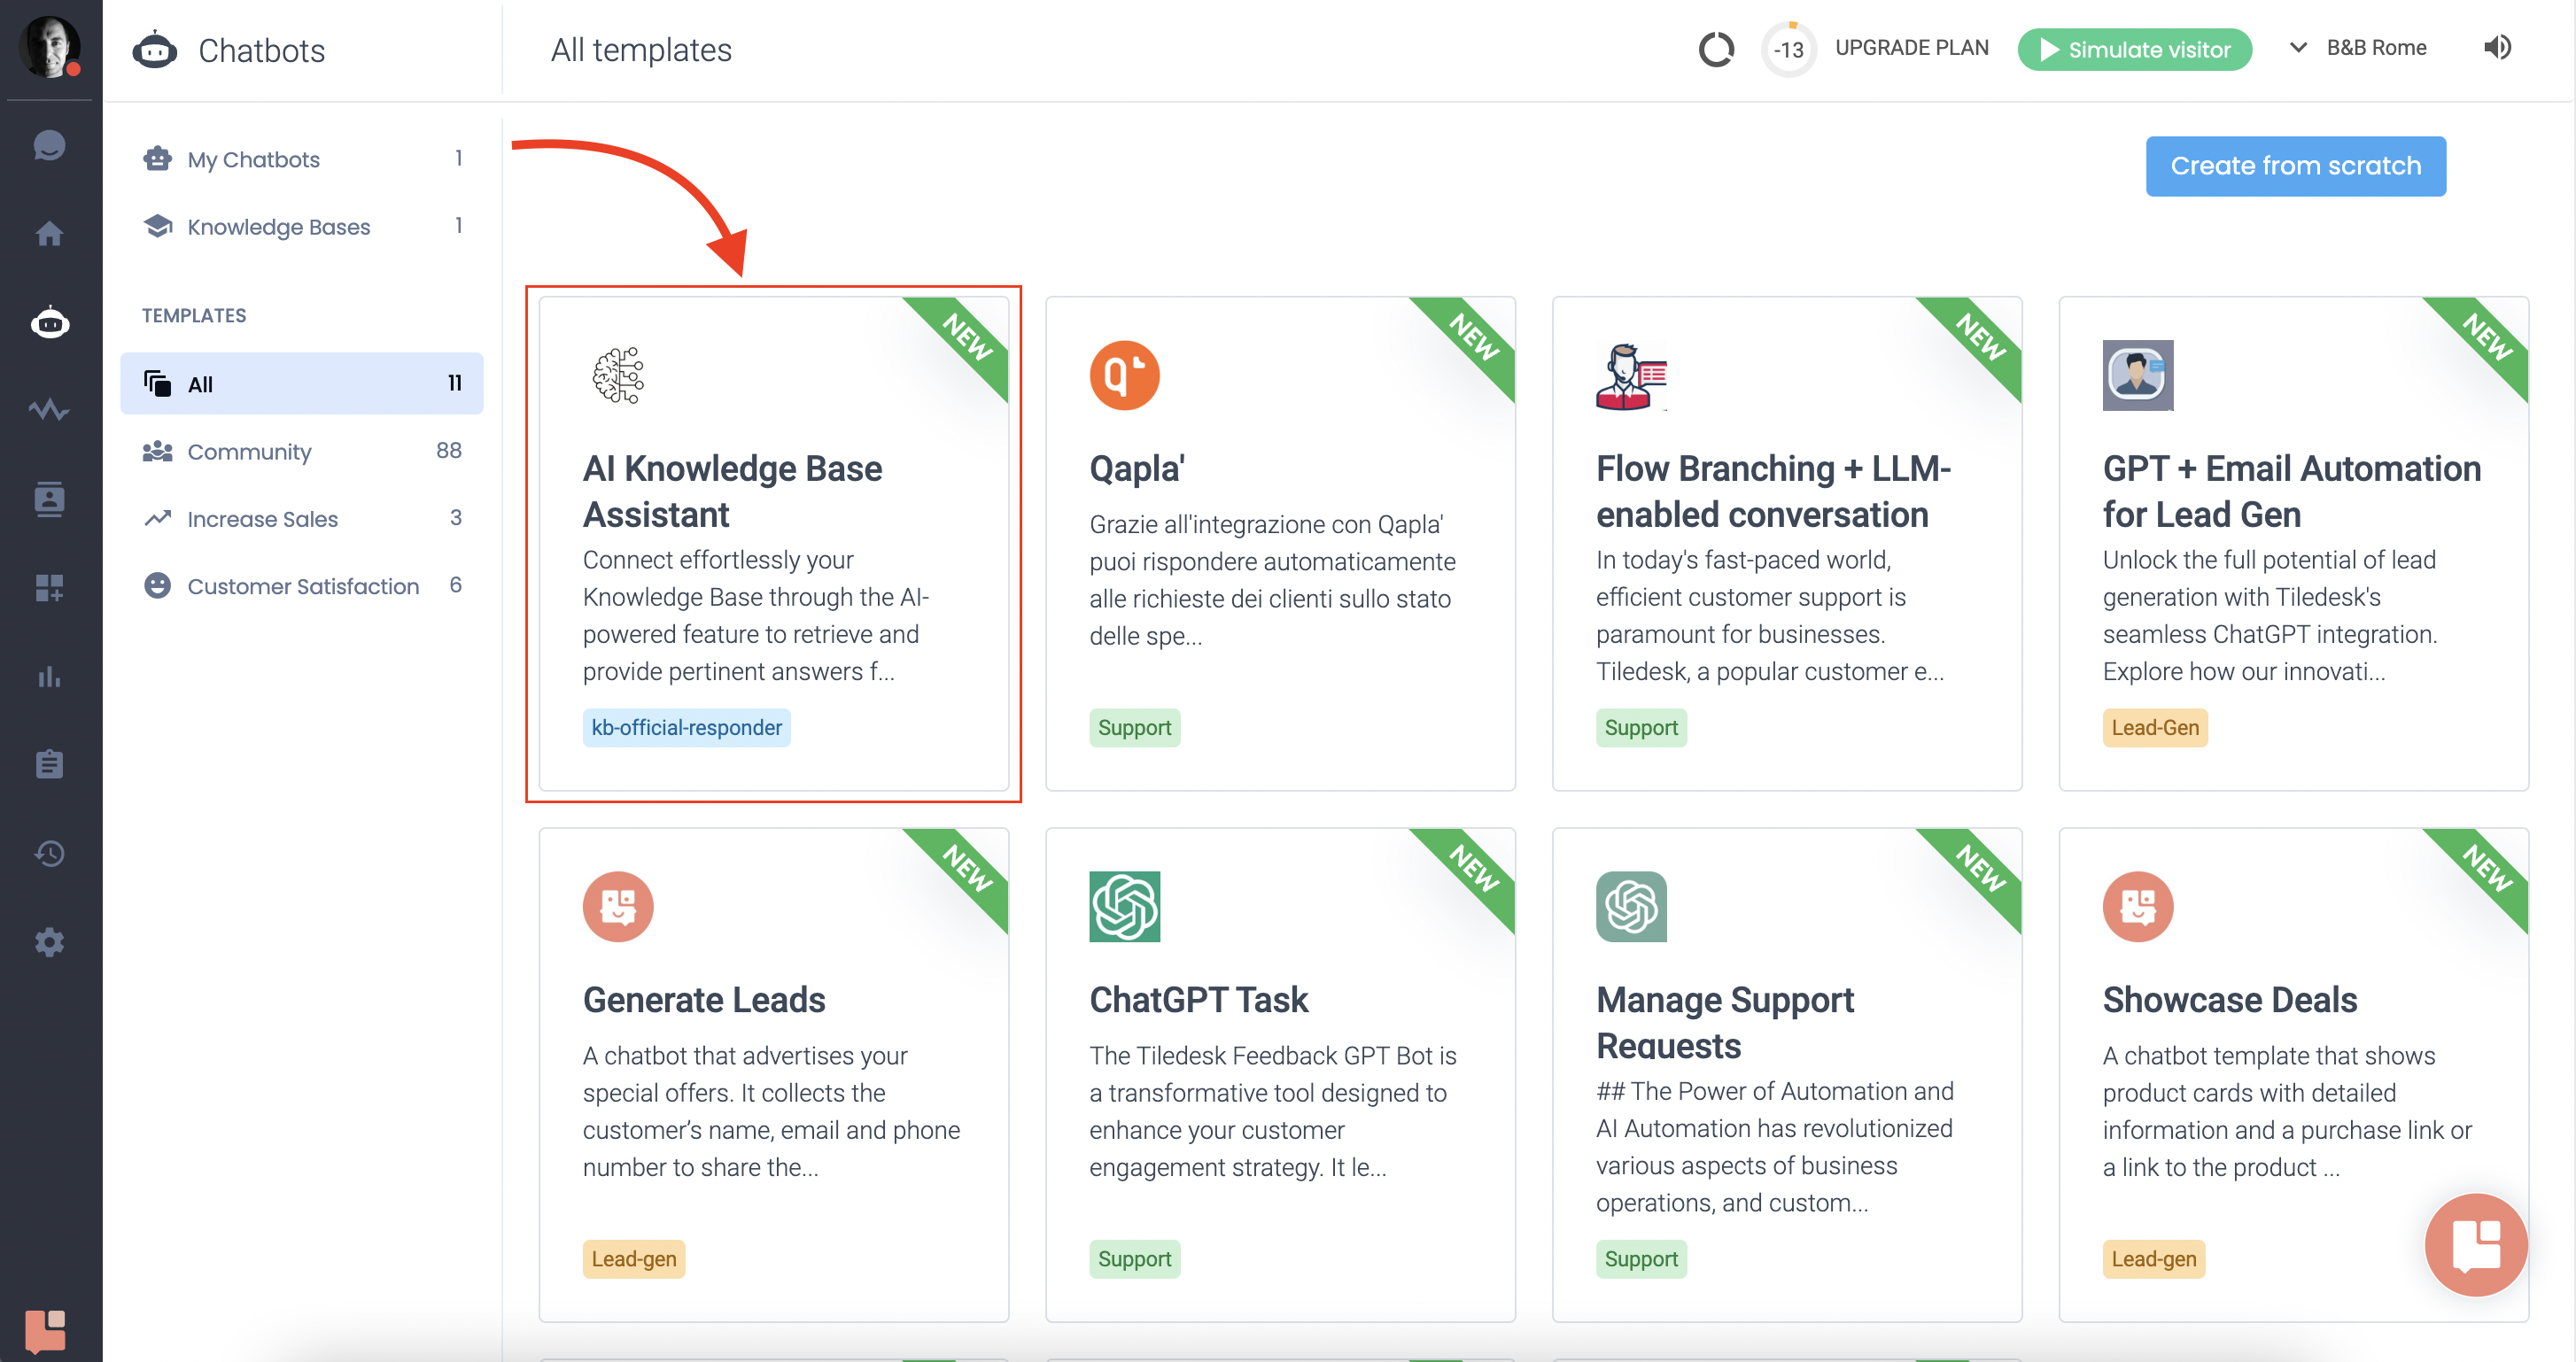
Now, it’s time to get back to the “My Chatbots” to edit/create an AI agent to use this action in it. Alternatively, you can use the free and customizable chatbot templates. For this example, I have used a template called “AI Knowledge Base Assistant”.
To import one template to your project, click on the “Add from Template” from the top right of the “My Chatbots” and pick the correct template.
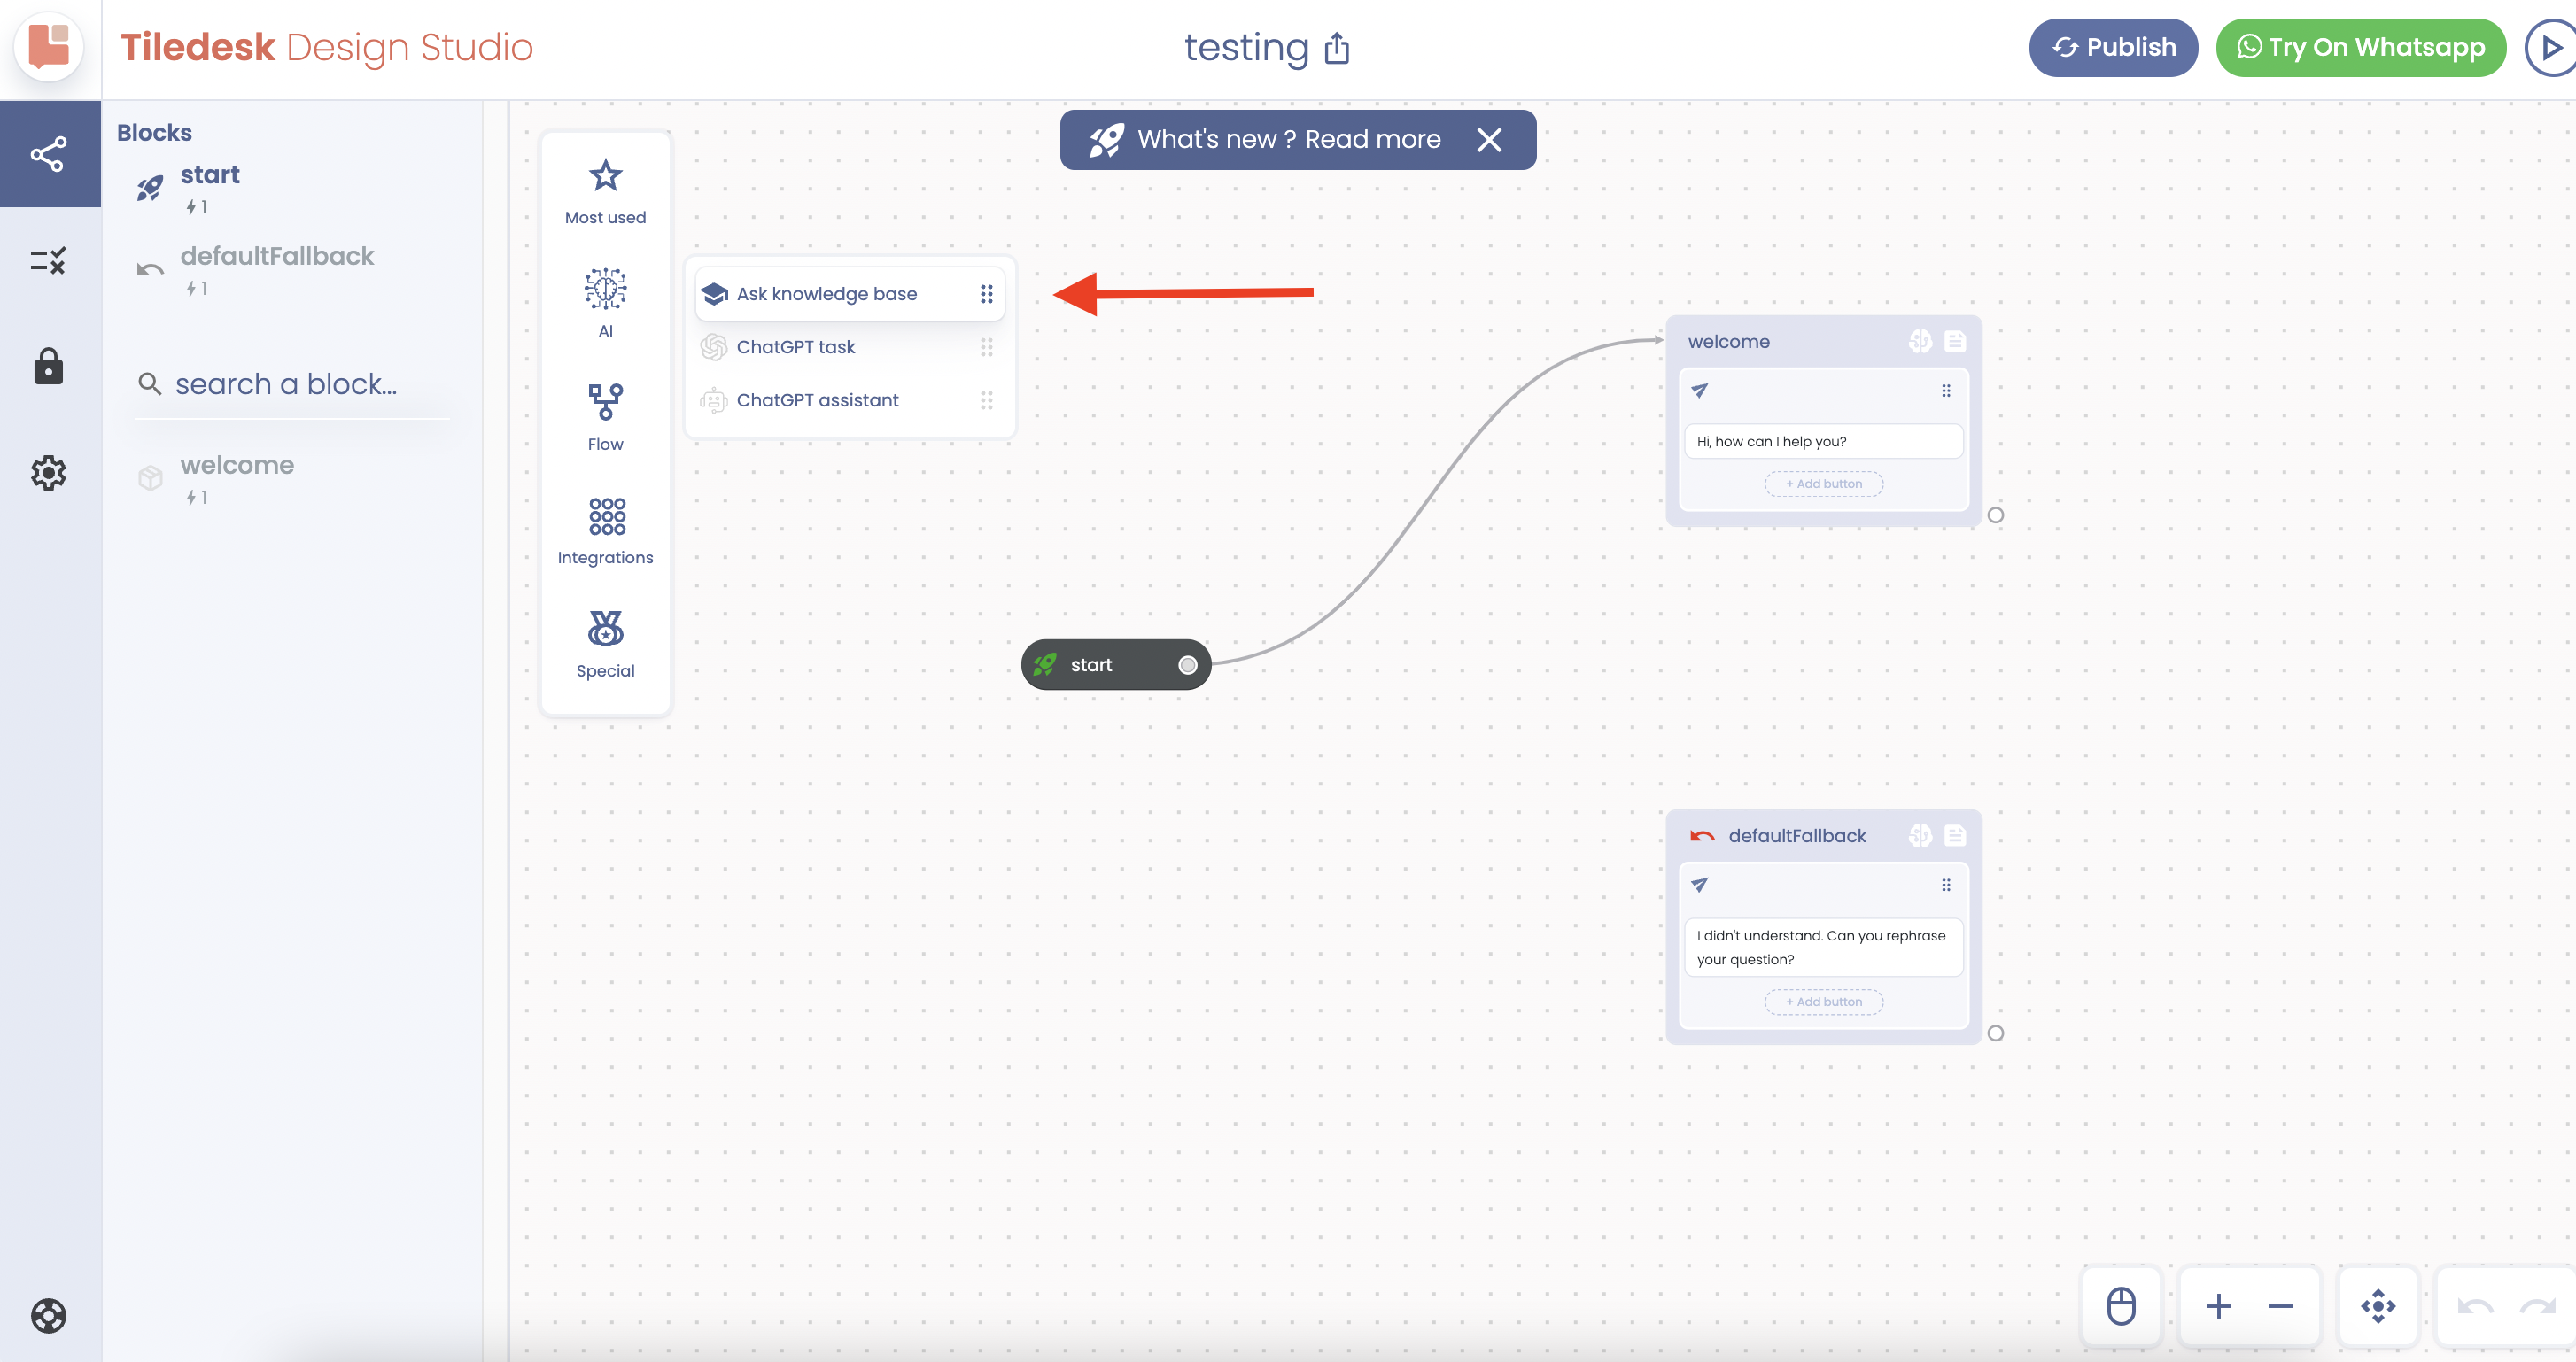
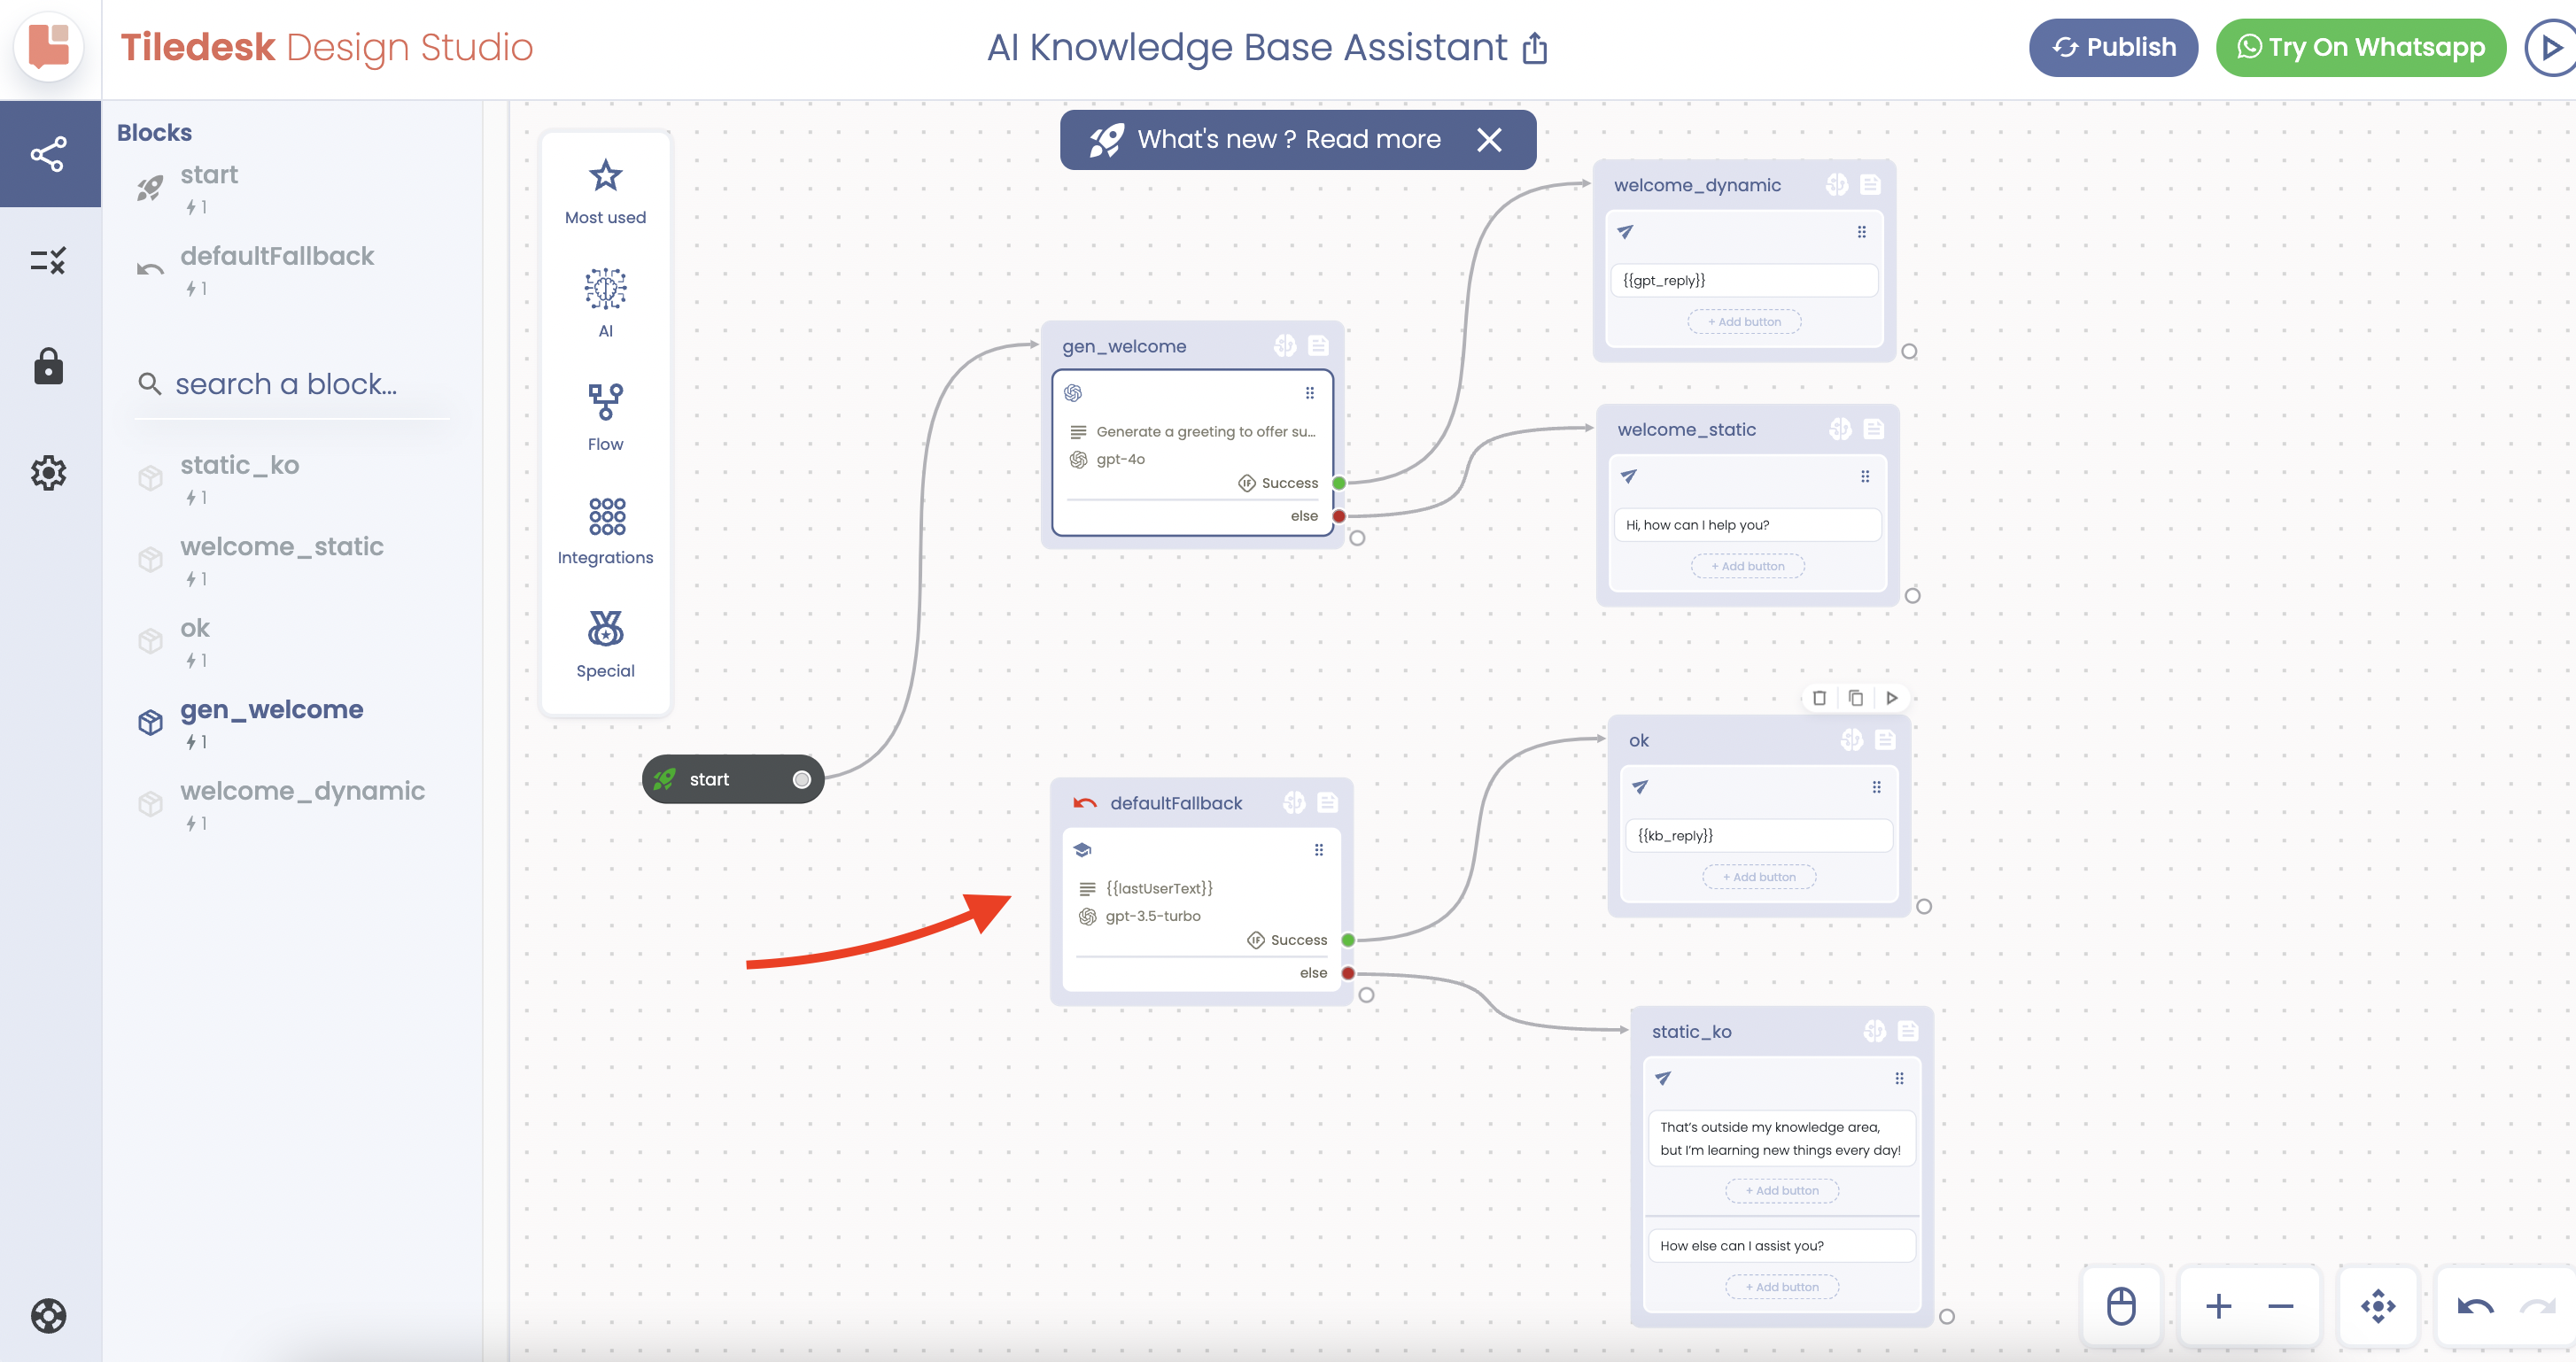
As you can see, the conversation has already been designed. For this template, we used two different AI features: the Ask Knowledge Base in the defaultFallback block and the ChatGPT task in the Welcome block, which generates welcoming messages based on the user’s language.
Ask Knowledge Base configuration:
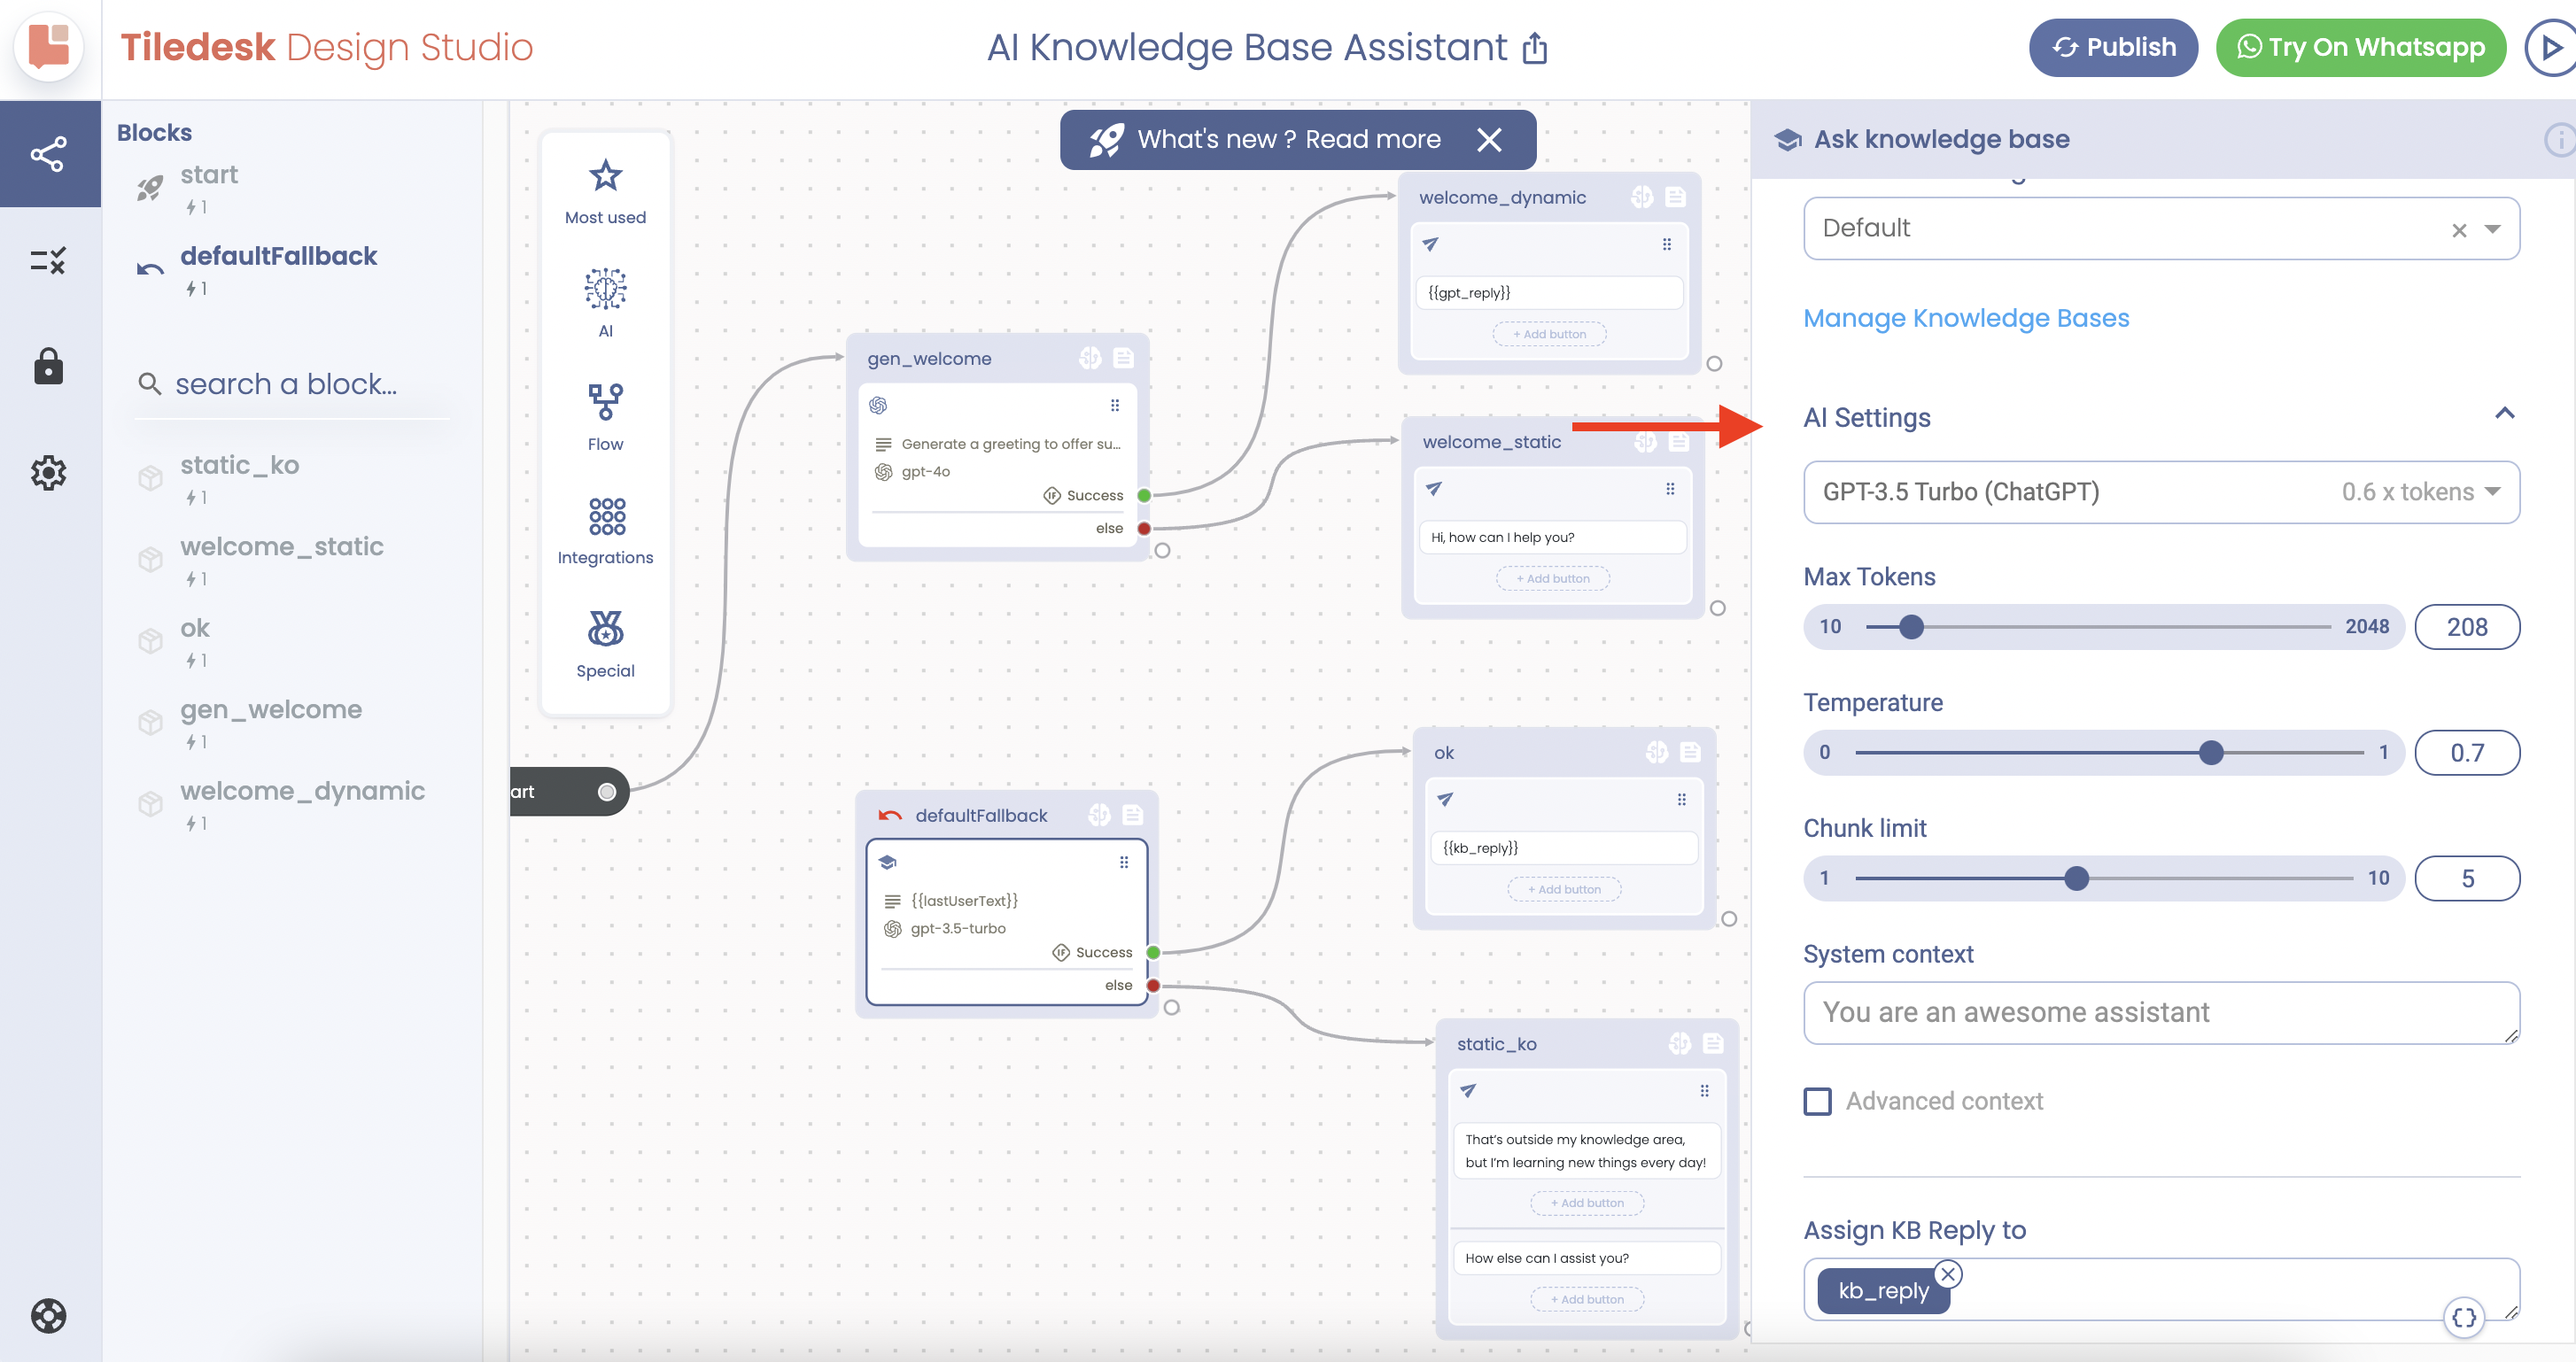
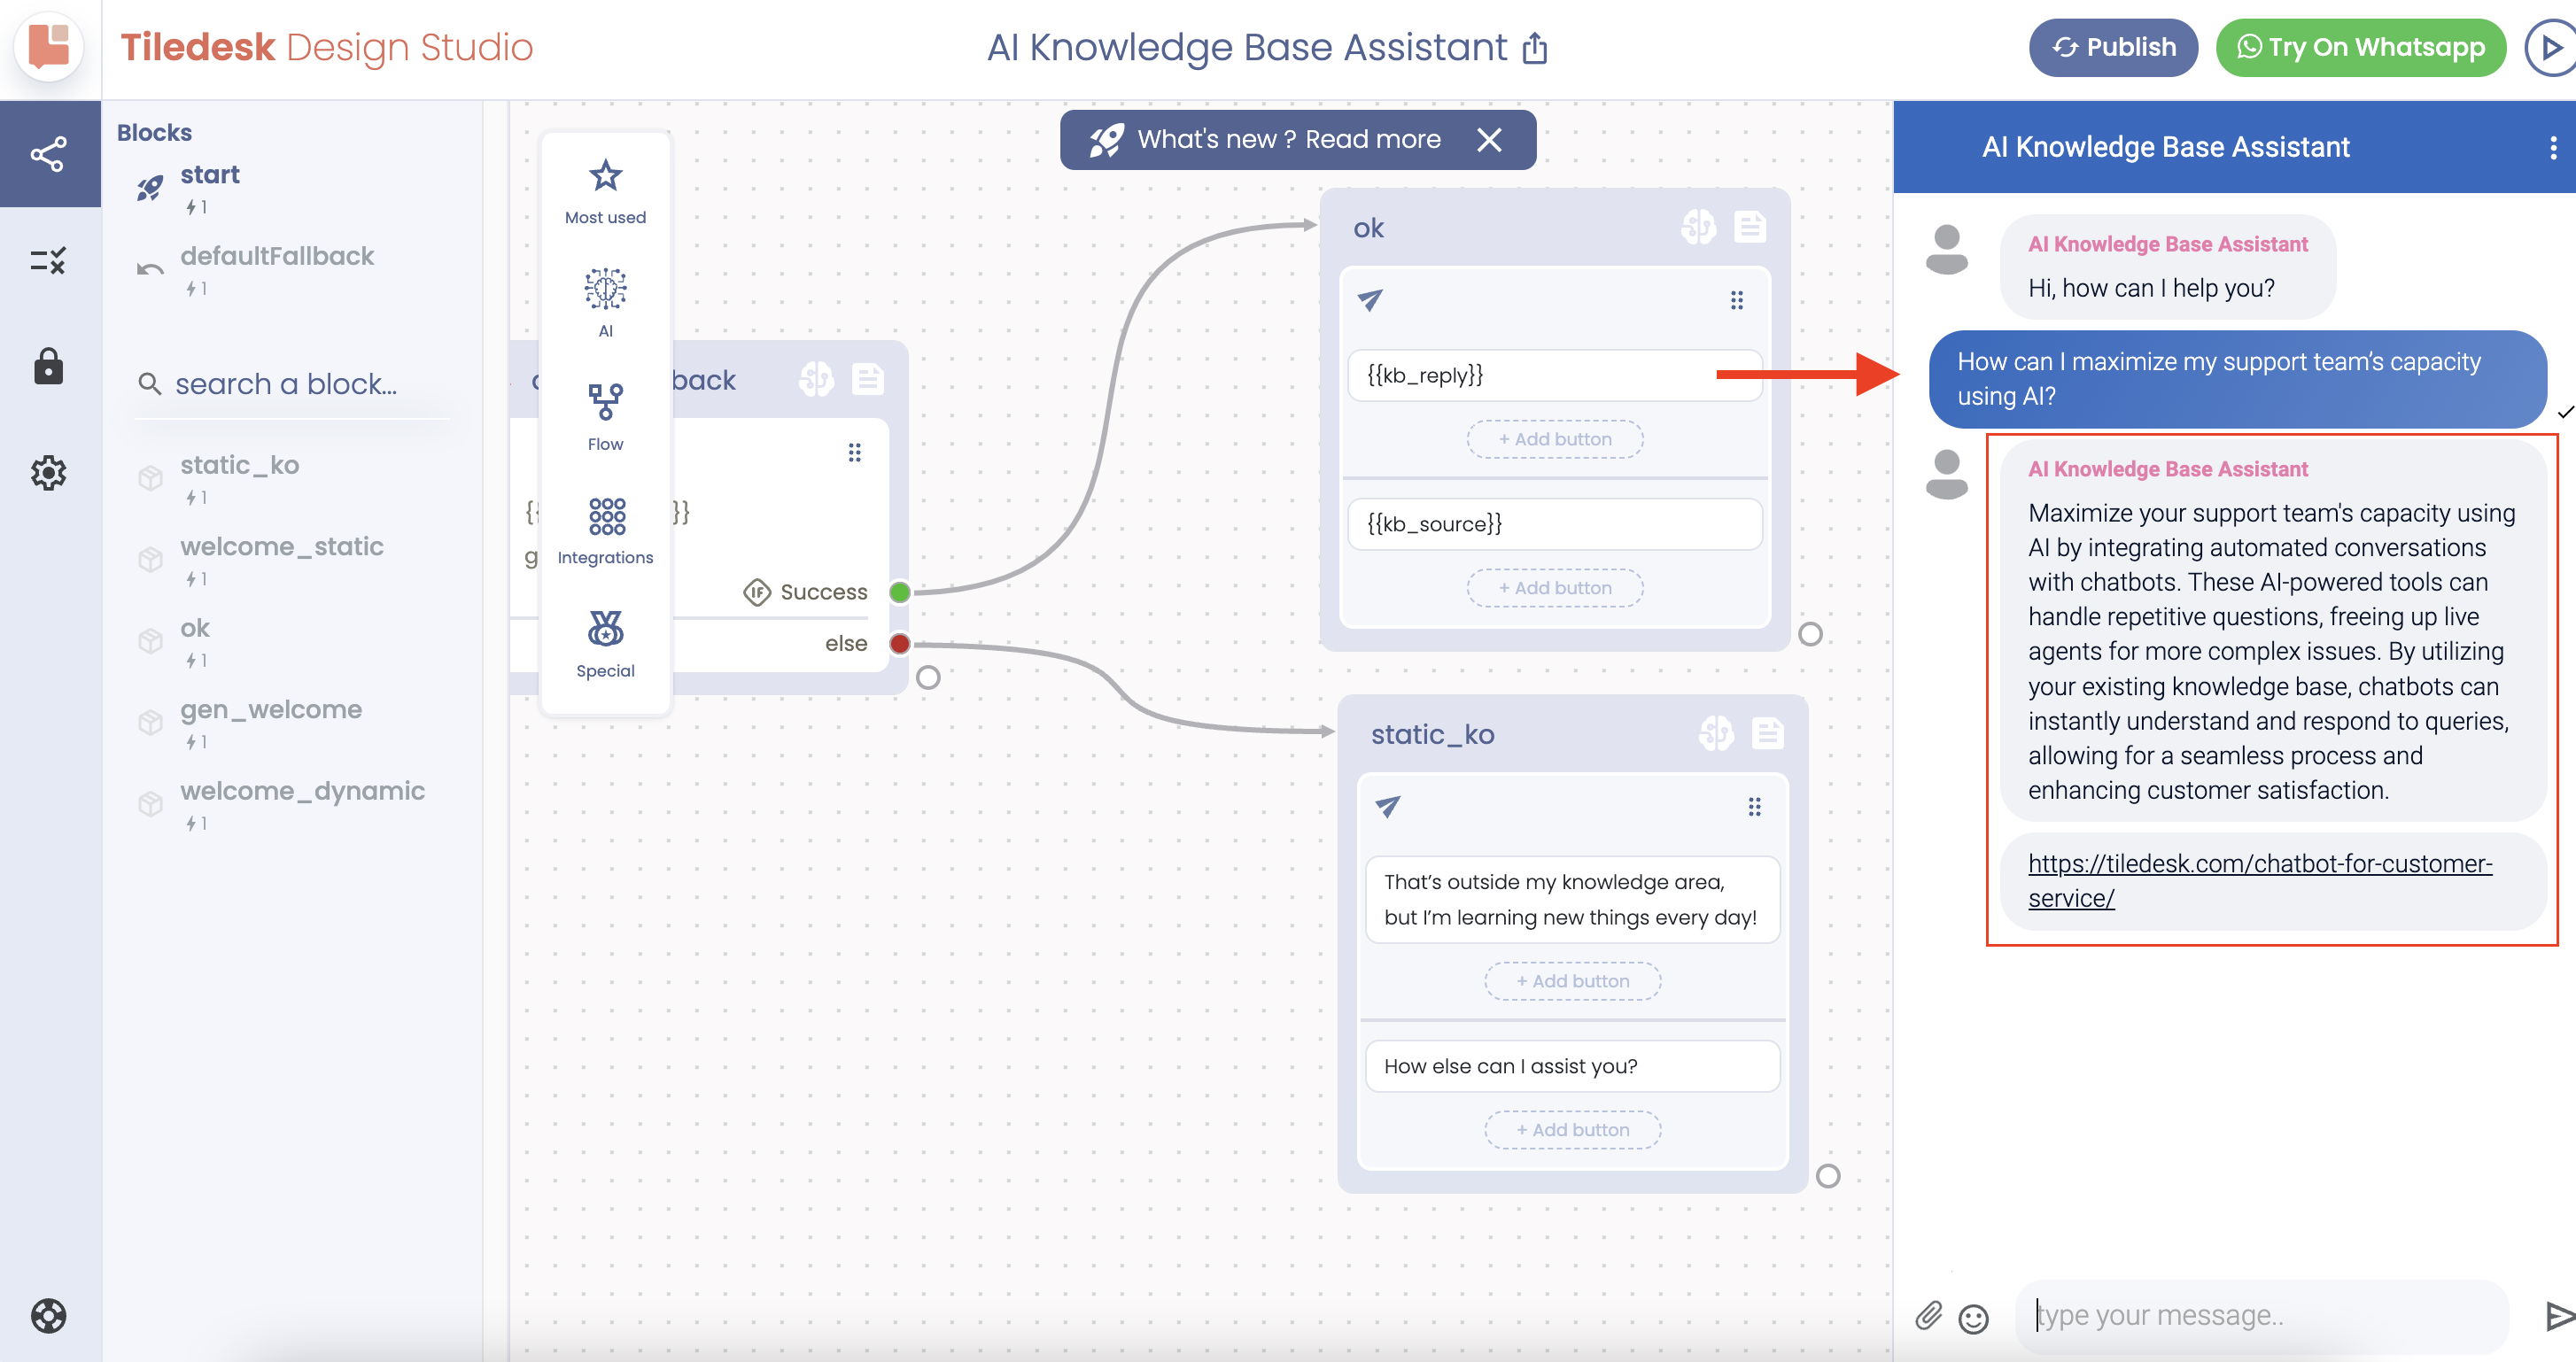
By clicking on the defaultFallback block, you will see a pop-up menu appears in the right section. This menu enables you to define your prompt, which we leave as default for this example. There are also two attributes here: kb_reply, which is the generated answer via your AI agent, and kb_source, which is the source of the answer.
These settings allow you to customize how your AI agent interacts with the knowledge base and presents information to the user.

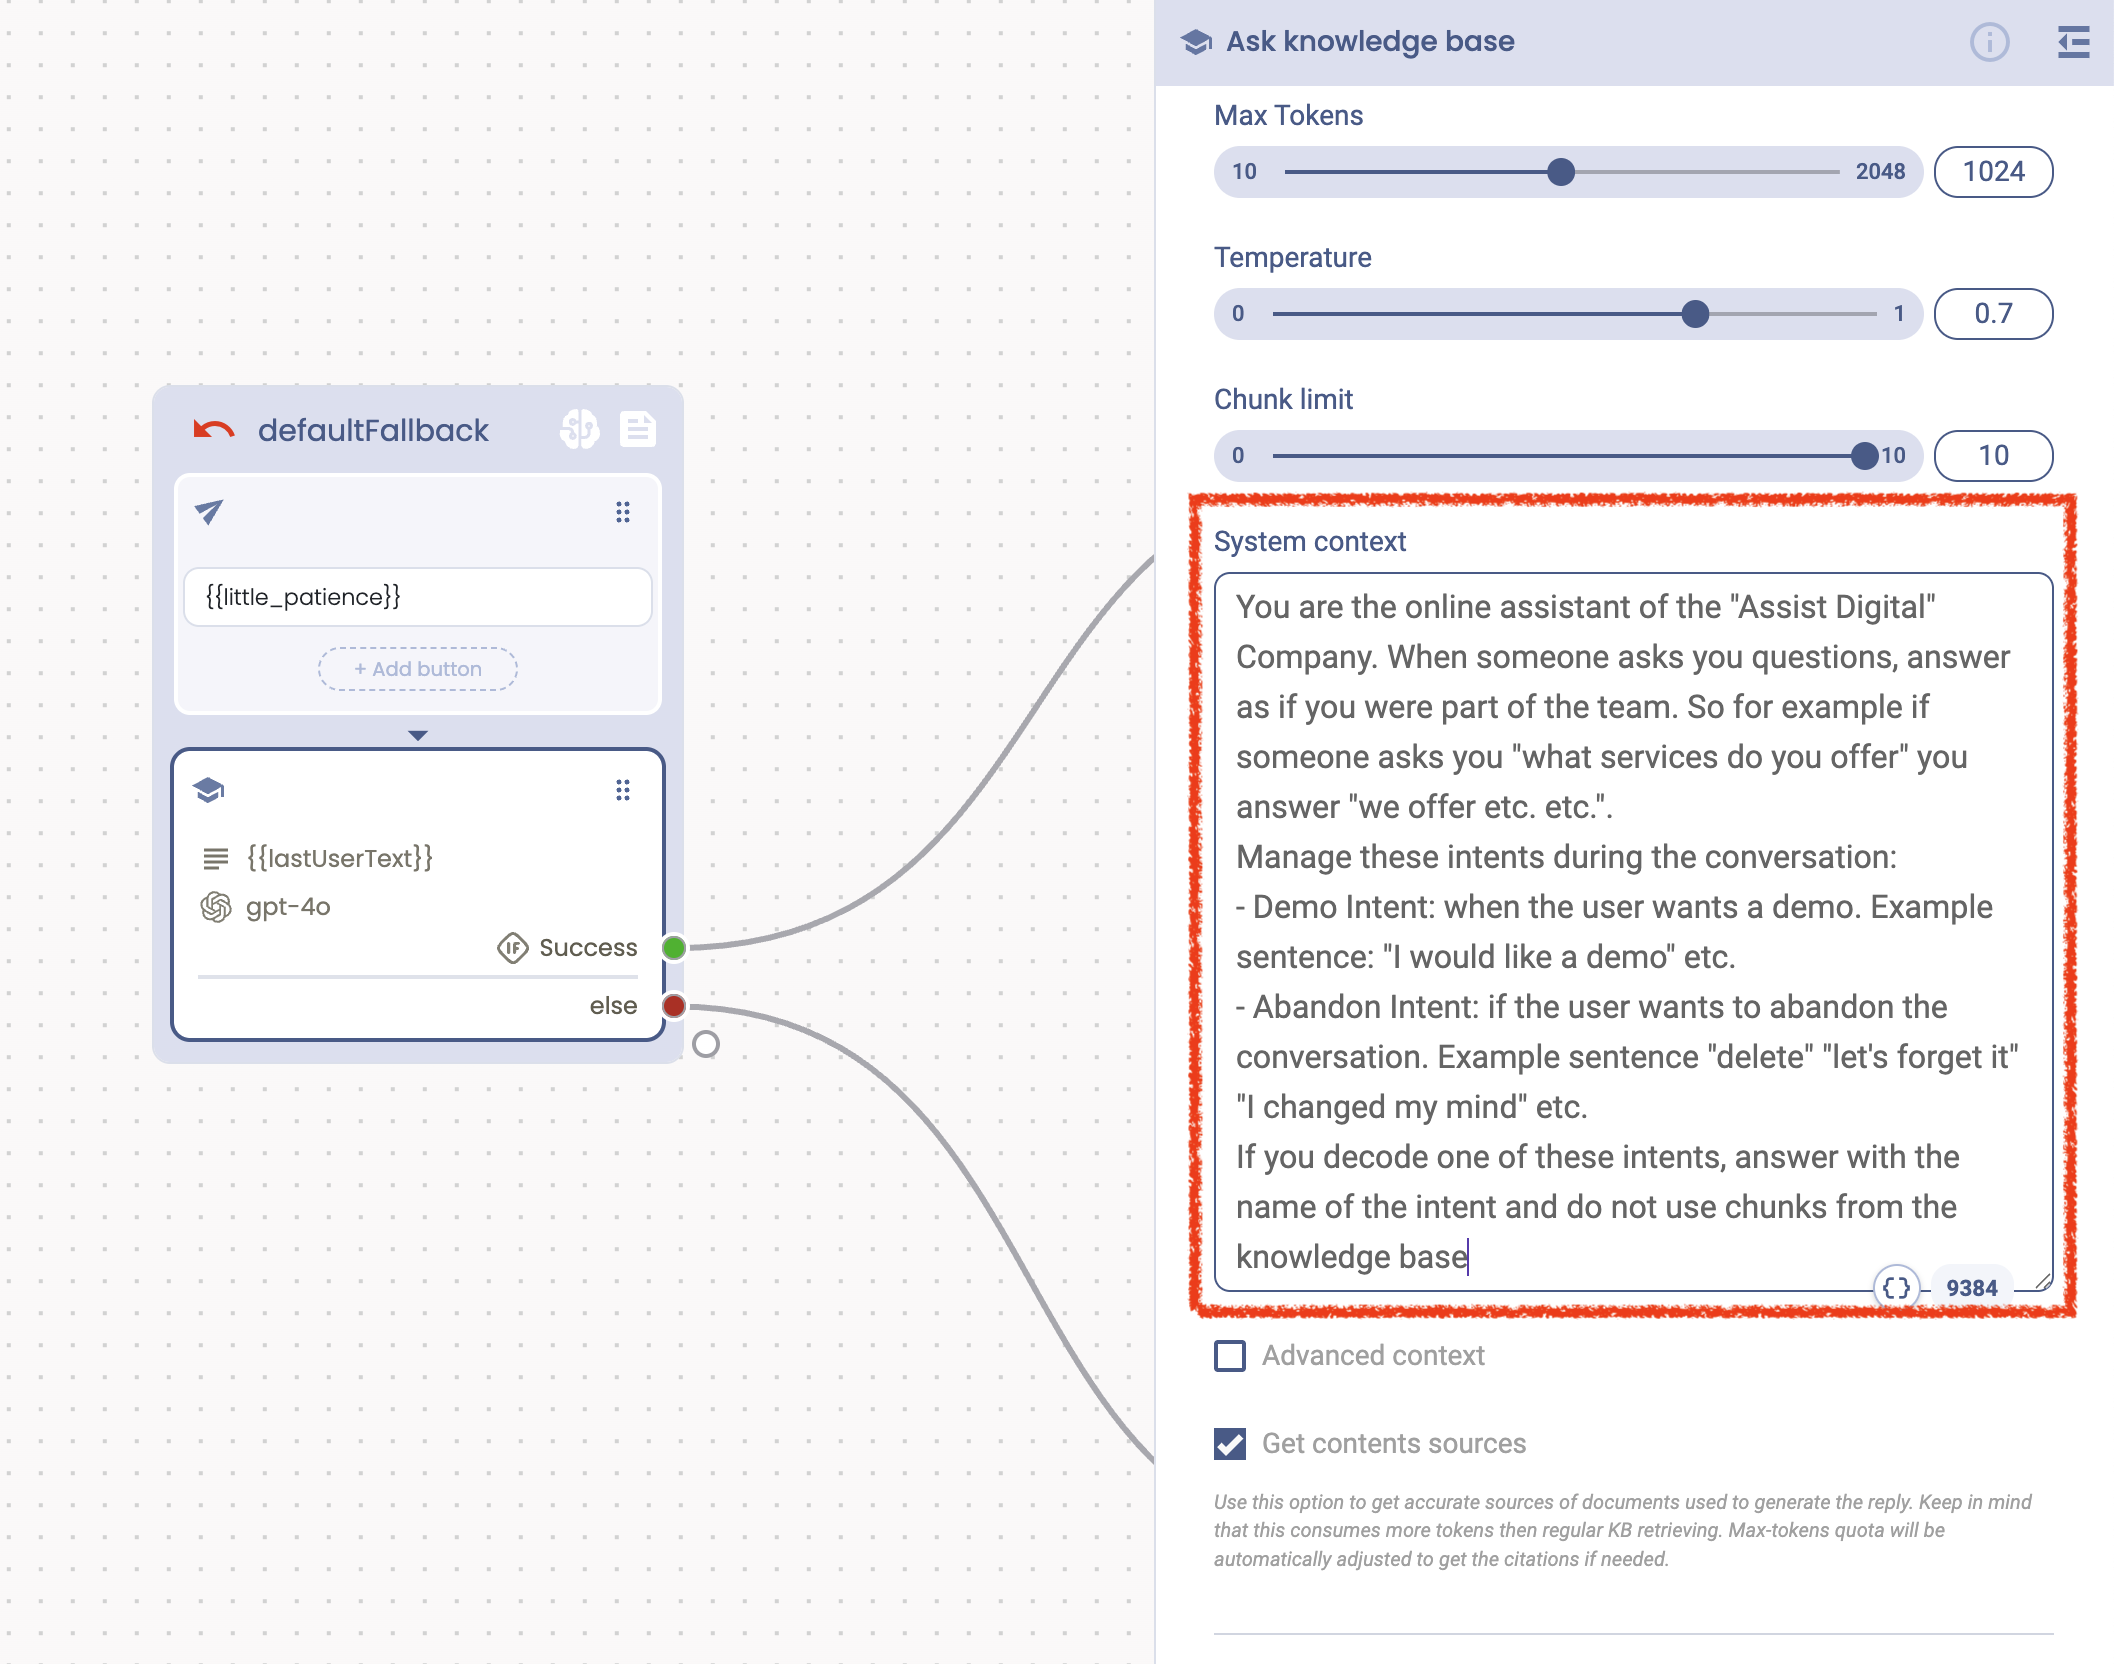
Configure AI settings:
You can also see an option for AI setting configuration
OpenAI Models: You have the option to use different AI models, from the GPT-3.5 to GPT-4o - the most recent model, but each consumes a different amount of tokens.
Max Tokens: This sets the total number of tokens you want to use when completing your prompt.
Temperature: This setting influences the variability of your responses. A higher temperature increases variability, while a lower temperature yields more exact, prompt-focused answers.
Chunk: Your AI agent selects data “chunks” with the highest relevance to the question/prompt. Each chunk includes specific information that the bot is using to answer the user’s question.
Testing the AI Agent
Now that we have uploaded our content in the system and used a ready-to-go chatbot template for it, it’s time to test the AI agent.
As you can see, our AI agent has generated a welcome message and accurately answered my question based on the website URLs I uploaded on the system.
We hope this tutorial helps you in creating specified AI Agents.
Get contents sources
Use this option to get accurate sources of documents used to generate the reply. Keep in mind that this consumes more tokens then regular KB retrieving. Max-tokens quota will be automatically adjusted to get the citations if needed.
Youo can always use the kb_sources output attributes to get your sources.
Advanced context
Whenever you use the Ask KB action, behind the scenes, OpenAI is invoked with a specific system context automatically created by Tiledesk. This context is a mix of the system context you provides (if any) and an hidden context instructing OpenAI on how use the Vector Database chunks to create the final reply for your end-users.
With the Advanced context feature you can directly manipulate the hidden context, improving tuning of your replies, when necessary. Keep in mind that the Tiledesk provided system context is already engineered to create the best possibile answers. But sometimes this is not sufficient to address all your targets, so this feature comes really handy to overcome the perceived limits of Tiledesk pre-engineered prompts.
Another thing that you have to keep in mind is the each model (i.e. gpt-40, gpt-4o-min etc.) has his own pre-engineered context. This is for example the system context that Tiledesk uses for the gpt-4o model.
gpt-4o pre-engineered system context used by the Tiledesk Ask Knowledge Base Action:
you are an helpful assistant for question-answering tasks. Follow these steps carefully:
1. If the question was in English, answer in English. If it was in Italian, answer in Italian. If it was in French, answer in French. If it was in Spanish, answer in Spanish, and so on, regardless of the context language
2. Use ONLY the pieces of retrieved context delimited by #### to answer the question.
3. If the context does not contain sufficient information to generate an accurate and informative answer, return <NOANS>
####{context}####
Let's think step by step.
The system context that you provide in the dedicated text area is appendend to the end of the pre-engineered context.
If for example you provide your own special system context:
The final context submitted to OpenAI will be something like the following:
you are an helpful assistant for question-answering tasks. Follow these steps carefully:
1. If the question was in English, answer in English. If it was in Italian, answer in Italian. If it was in French, answer in French. If it was in Spanish, answer in Spanish, and so on, regardless of the context language
2. Use ONLY the pieces of retrieved context delimited by #### to answer the question.
3. If the context does not contain sufficient information to generate an accurate and informative answer, return <NOANS>
####{context}####
Let's think step by step.
You are the online assistant of the "Assist Digital" Company. When someone asks you questions, answer as if you were part of the team. So for example if someone asks you "what services do you offer" you answer "we offer etc. etc.".
Manage these intents during the conversation:
- Demo Intent: when the user wants a demo. Example sentence: "I would like a demo" etc.
- Abandon Intent: if the user wants to abandon the conversation. Example sentence "delete" "let's forget it" "I changed my mind" etc.
If you decode one of these intents, answer with the name of the intent and do not use chunks from the knowledge base
As you can see we added the provided system context appended at the end of the pre-engineered context, just after “Let's think step by step.”
Pre-engineered System Context anatomy
When you will switch to Advanced context Tiledesk doesn't use the pre-engineered system context anymore and awaits for you to provide all the new system context.
IMPORTANT: You must always start from a pre-engineered context because it has an anatomy that you must comply and understand if you want the automation engine to continue working as expected. For example, it's really important to explain in the prompt when to reply as “no answer in this context” replying with the NOANS tag, as the following picture explains:
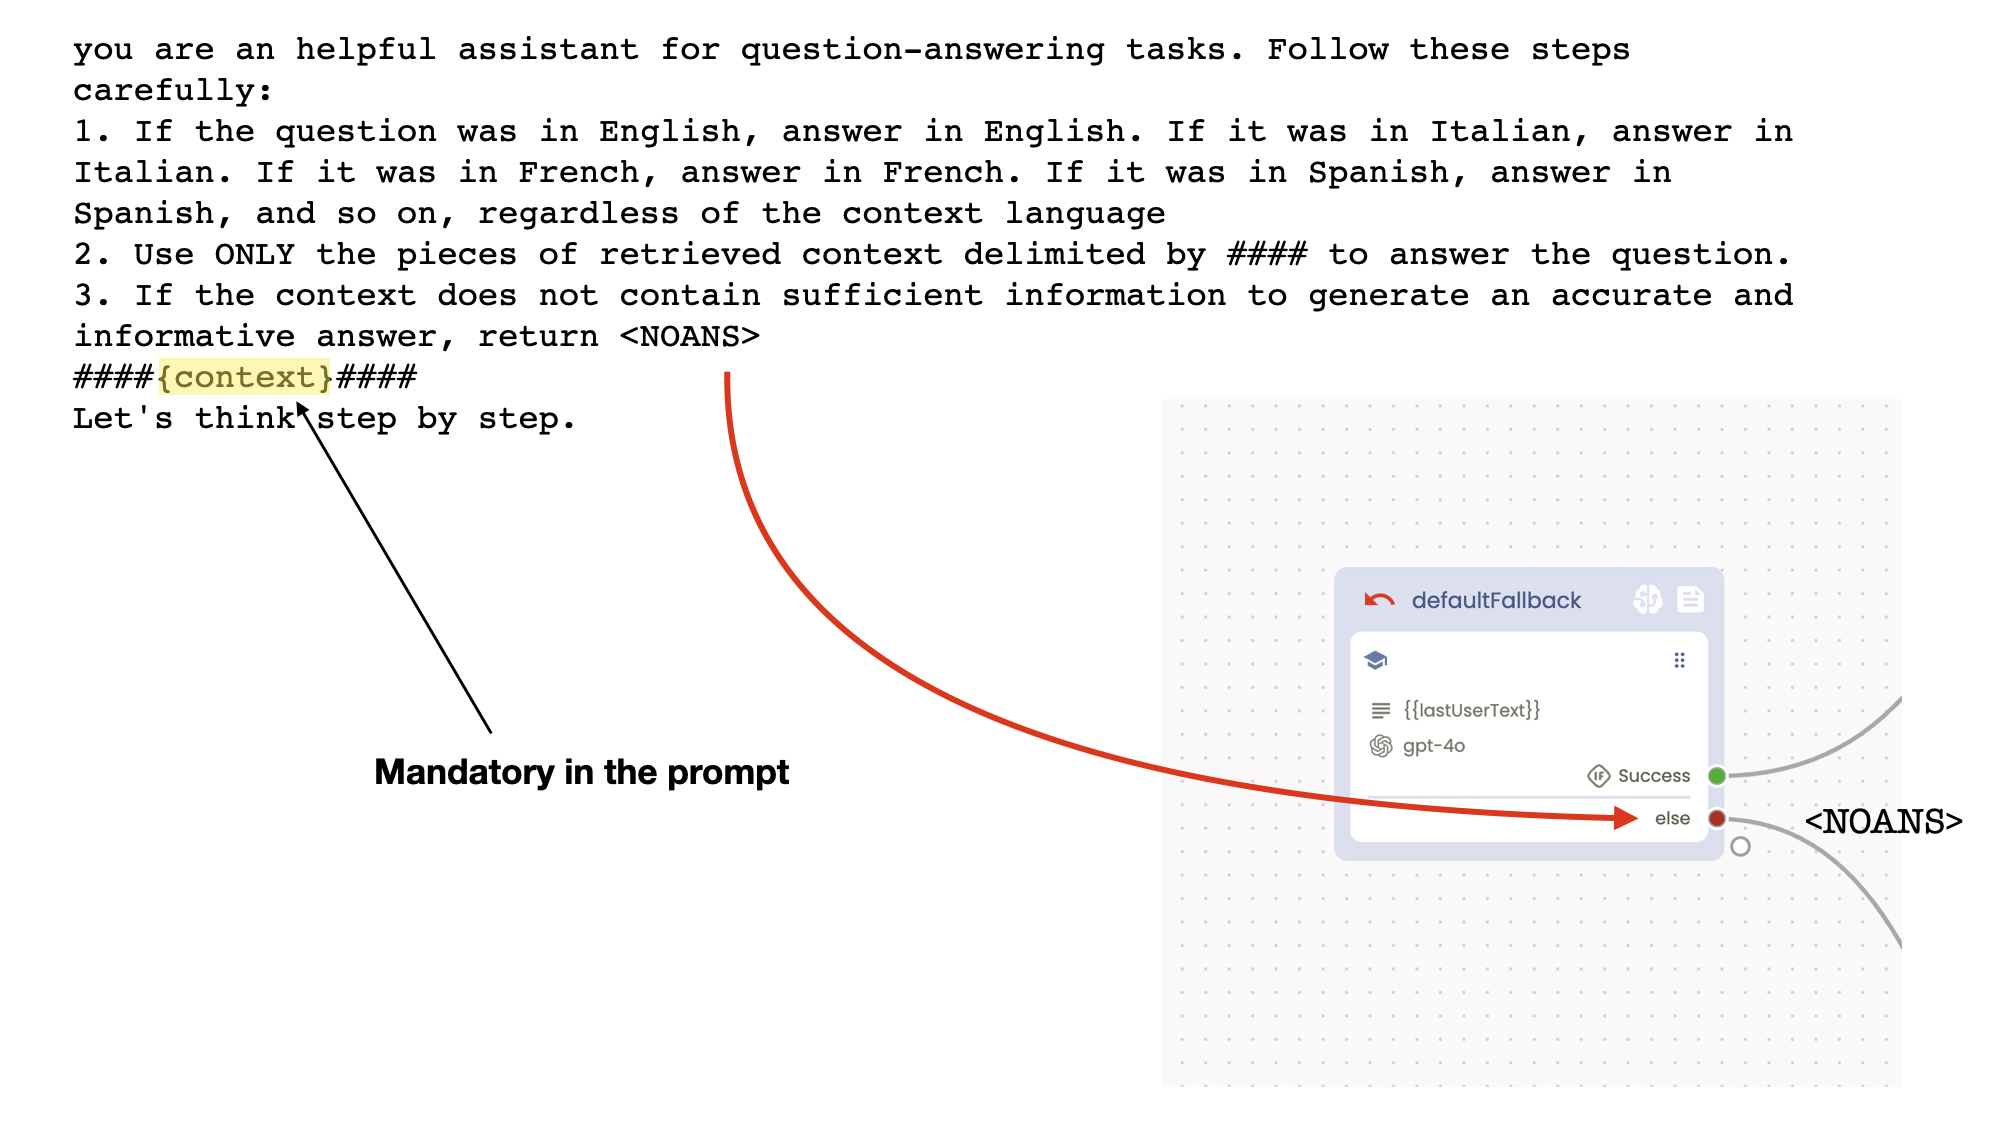
You must always supply the {context} tag, because it will be dynamically replaced by the chunks returned by the Vector Index DB.
Advanced context supply
Once you switch to the Advanced context mode you'll be responsible to provide the whole system context. You can start mixing up the two contexts using the above context as a start example, as in the following picture:
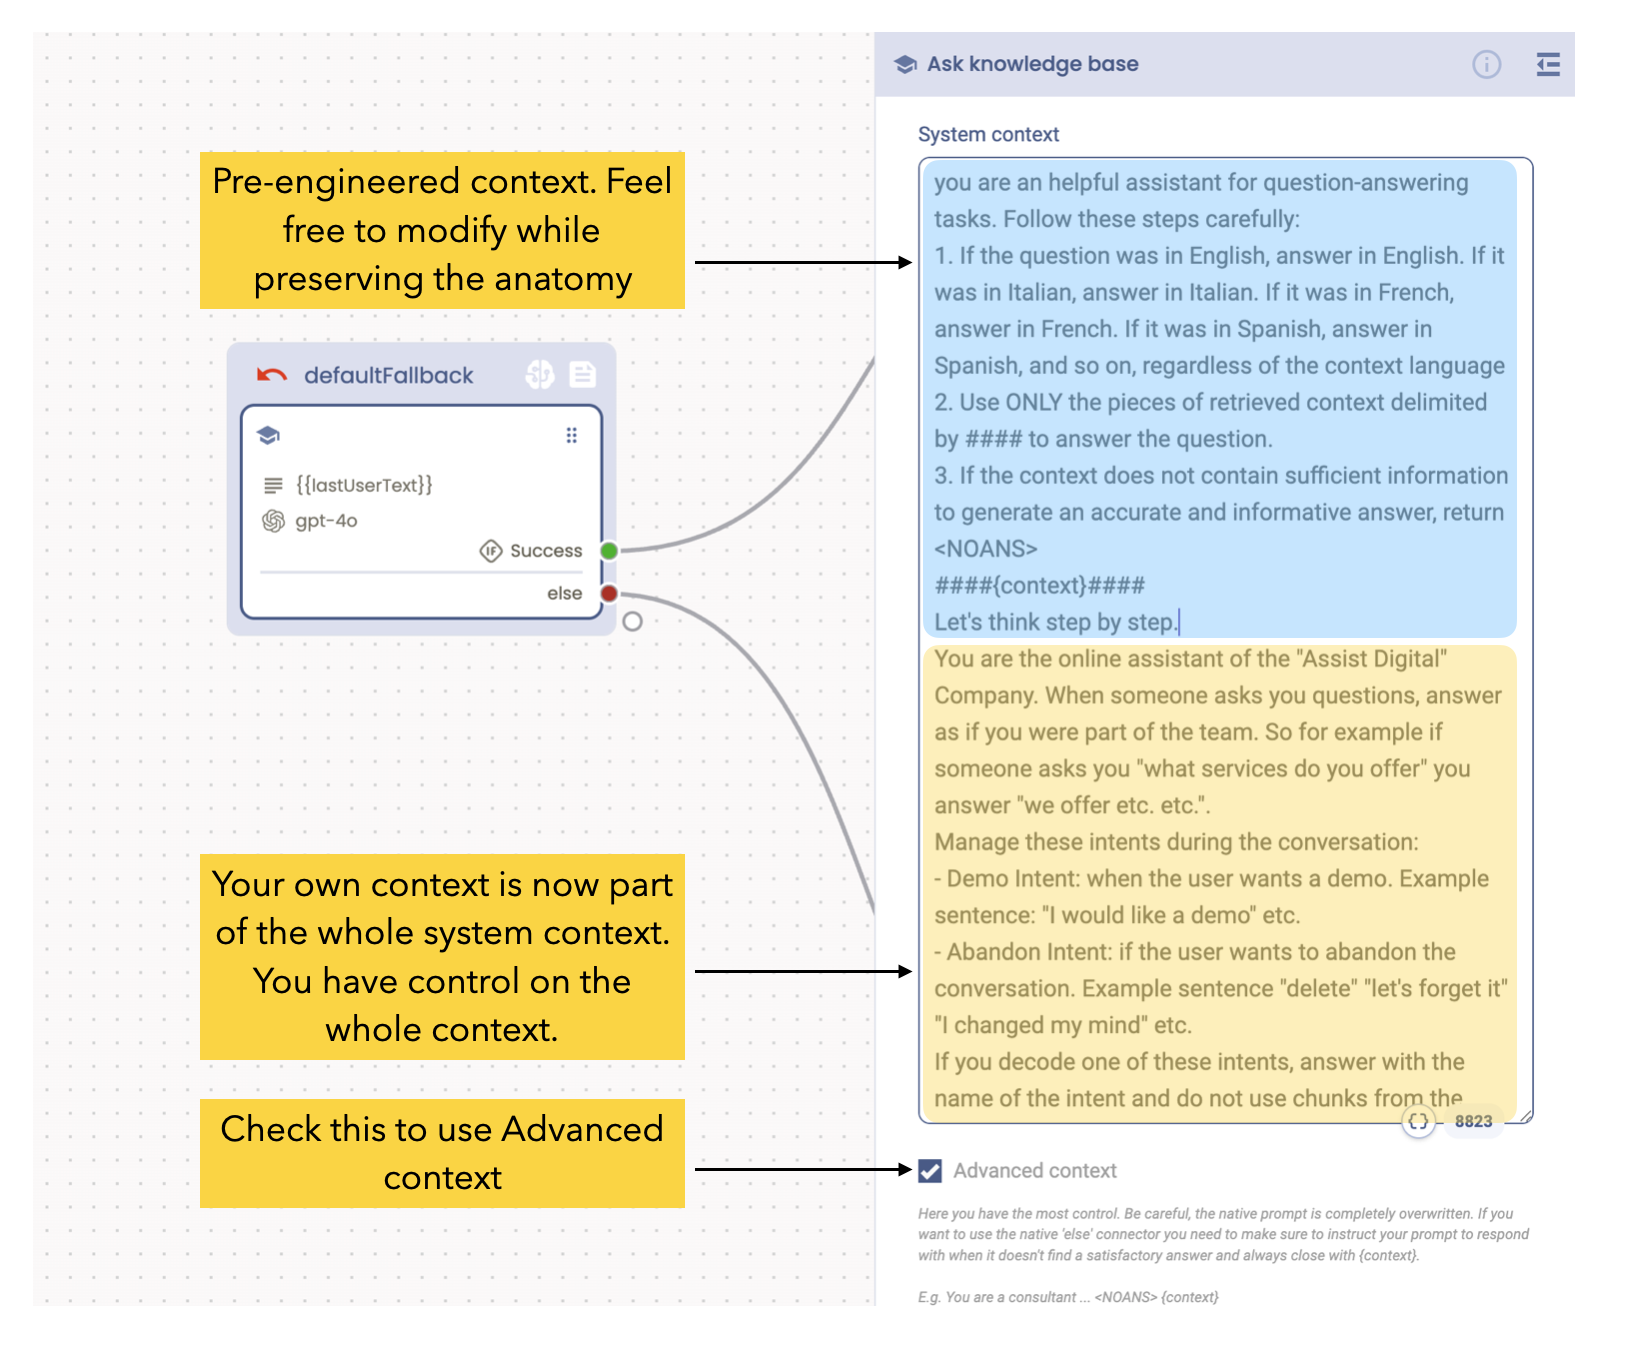
Feel free to modify the context while preserving the anatomy. Your own context will be an explicit, visible part of the whole system context. With Advanced context you have control on the whole context.
To get started, create a free account here.
If you have any questions, do not hesitate to contact us via support@tiledesk.com.
For more information, please visit www.tiledesk.com.